How to use parameters
Parameters are variables users set at runtime to build dynamic, reusable queries without writing SQL
Parameters are variables that allow you to create dynamic, reusable queries in Qyra. They enable users to interact with and customize queries without needing to write SQL.
Parameters are defined in your qyra.config.yml file or in a schema.yml file for a specific model, and can be referenced in various parts of your Qyra project.
If you're new to qyra.config.yml, check out our getting started guide to learn how to create and set up this file.
Watch this video to see Parameters in action! You can also try it out in our live demo.
What are parameters?
Parameters are variables that you can define once and reference in multiple places throughout your Qyra project. They allow you to:
- Create dynamic filters that users can change at runtime
- Make your SQL more reusable and maintainable
- Allow non-technical users to customize queries without writing SQL
- Save parameter values at the chart and dashboard level
For example, you might define a region parameter that users can set to filter data by different geographic regions, a date_range parameter that allows users to select different time periods for analysis, or a min_revenue parameter with numeric values that allows users to set revenue thresholds for analysis.
Parameter Types: Parameters support string, date, and number values. You can use strings (like "EMEA") or numbers (like 1000) or dates (date parameters will show a calendar picker) as parameter options.
Where can you use parameters?
Parameters can be referenced in many places throughout your Qyra project:
- Dimension SQL: Use parameters in the SQL definition of a dimension
- Metric SQL: Use parameters in the SQL definition of a metric
- Table SQL: Use parameters in sql_from and sql_filter definitions
- Table Joins: Use parameters in join conditions
- SQL Runner: Use parameters in the SQL Runner query
- Table Calculations: Use parameters in table calculations
- Additional Dimensions: Use parameters in the SQL definition of an additional dimension
- Custom Dimensions: Use parameters in custom dimension definitions
Parameter types
Parameters in Qyra support different data types to help you work with various kinds of data. By default, all parameters are treated as strings, but you can convert them to other types as needed.
Supported parameter types
Qyra officially supports the following parameter types:
- String (default): Text values
- Number: Numeric values (integers and decimals)
- Date: Date values (date selector is shown in the UI)
Type conversion workarounds
While not officially supported yet, you can work around for other data types via SQL type casting.
To convert a parameter to a specific type, use the :: syntax followed by the type name:
${qyra.parameters.parameter_name}::typeThe type conversion happens at the SQL level, so the available types depend on your database system (PostgreSQL, BigQuery, Snowflake, etc.). Common types like integer, numeric, date, timestamp, and boolean are supported across most databases.
Boolean conversion
As a workaround, you can use ::boolean to convert string values like "true"/"false" to boolean:
-- Convert to boolean (workaround)
WHERE ${TABLE}.is_active = ${qyra.parameters.active_only}::boolean
Other type conversions
You can use any SQL type conversion that your database supports:
-- Convert to specific database types
WHERE ${TABLE}.category_id = ${qyra.parameters.category}::uuid
WHERE ${TABLE}.amount = ${qyra.parameters.amount}::decimal(10,2)
How to reference parameters in SQL
Project-level parameters
To reference project-level parameters in SQL, use the following syntax:
${qyra.parameters.parameter_name}For example, to reference a parameter named region:
${qyra.parameters.region}Model-level parameters
To reference model-level parameters in SQL, you need to include the model name:
${qyra.parameters.model_name.parameter_name}For example, to reference a parameter named region from the orders model:
${qyra.parameters.orders.region}Using the shorter alias
You can also use the shorter alias ld instead of qyra:
# Project parameter
${ld.parameters.parameter_name}

# Model parameter
${ld.parameters.model_name.parameter_name}
For example:
# Project parameter
${ld.parameters.region}

# Model parameter from orders model
${ld.parameters.orders.region}
How to define parameters
Parameters can be defined at two different levels in your Qyra project.
For the full list of parameter properties, see Parameters configuration below.
Parameters must include at least one of the following properties to ensure the input form works correctly: allow_custom_values, options, or options_from_dimension. Without one of these, users won't be able to set parameter values in the UI.
Project-level parameters
Project-level parameters are defined in your qyra.config.yml file and are available across your entire project. Here's an example:
parameters:
  # Parameter with simple options list
  team:
    label: "Team"
    description: "Filter data by team"
    options:
      - "Sales"
      - "Marketing"
      - "Finance"
    default: "Sales"

  # Parameter with multiple selection enabled
  region:
    label: "Region"
    description: "Filter data by region"
    options:
      - "EMEA"
      - "AMER"
      - "APAC"
    default: ["EMEA", "AMER"]
    multiple: true

  # Parameter with number type
  min_revenue:
    label: "Minimum Revenue"
    description: "Filter for minimum revenue threshold"
    type: "number"
    options:
      - 1000
      - 5000
      - 10000
    default: 5000

  # Parameter with date type
  min_date:
    label: "Minimum date"
    description: "Filter to only show data after this date"
    type: "date"

  # Parameter with options from a dimension
  department:
    label: "Department"
    description: "Filter data by department"
    options_from_dimension:
      model: "employees"
      dimension: "department"

  # Parameter with labeled options — display text differs from the underlying value
  status:
    label: "Status"
    description: "Filter data by status"
    options:
      - label: "Active"
        value: "active_id_1"
      - label: "Inactive"
        value: "inactive_id_2"
default: "active_id_1"For the full list of project-level parameter properties, see Parameters configuration below.
Model-level parameters
Model-level parameters are defined within individual model YAML files in your dbt project and are scoped to the model where they are defined. These parameters are defined in the meta.parameters section of your model configuration:
models:
  - name: orders
    config:
      meta:
        parameters:
          date_range_start:
            label: "Date Range Start"
            description: "Start date for filtering orders in custom time period metrics"
            type: "date"
          date_range_end:
            label: "Date Range End"
            description: "End date for filtering orders in custom time period metrics"
type: "date"models:
- name: orders
meta:
parameters:
date_range_start:
label: "Date Range Start"
description: "Start date for filtering orders in custom time period metrics"
type: "date"
date_range_end:
label: "Date Range End"
description: "End date for filtering orders in custom time period metrics"
type: "date"type: model
name: orders
parameters:
date_range_start:
label: "Date Range Start"
description: "Start date for filtering orders in custom time period metrics"
type: "date"
date_range_end:
label: "Date Range End"
description: "End date for filtering orders in custom time period metrics"
type: "date"Model-level parameters offer the same configuration options as project-level parameters but provide better encapsulation and organization by keeping parameters close to where they're used.
For the full list of model-level parameter properties, see Parameters configuration below.
Parameters configuration
Each parameter is a key-value pair: the key is the parameter name (alphanumeric with underscores or hyphens) and the value is an object with the following properties. Project-level and model-level parameters share this schema.
| Property | Required | Value | Description |
|---|---|---|---|
label | Yes | string | A user-friendly label for the parameter as it will be displayed in the UI. |
description | No | string | A description of the parameter. |
type | No | "string", "number", or "date" | The type of the parameter. Defaults to "string" if not specified. |
options | No | Array of strings, numbers, or { label, value } objects | A list of possible values for the parameter. |
default | No | string, number, or array of strings/numbers | The default value(s) for the parameter. When using labeled options, the default must match a value, not a label. |
multiple | No | boolean | Whether the parameter input will be a multi-select. |
allow_custom_values | No | boolean | Whether users can input custom values beyond predefined options. |
options_from_dimension | No | Object | Get parameter options from a dimension in a model. Requires model and dimension arguments (see below). |
If using options_from_dimension, the object requires the following properties:
| Property | Required | Value | Description |
|---|---|---|---|
model | Yes | string | The model containing the dimension. |
dimension | Yes | string | The dimension to get options from. |
Labeled options
Static options can be plain values or { label, value } objects when the display text should differ from the underlying value — see the status parameter in the project-level example above. Plain string or number arrays remain the simplest form when the label and value are the same. With labeled options, default must match a value, not a label.
Examples of using parameters
Let's look at some examples of how to use parameters in different parts of your Qyra project.
In dimension SQL
You can reference parameters in the SQL definition of a dimension:
models:
  - name: orders
    columns:
      - name: filtered_revenue
        config:
          meta:
            dimension:
              type: number
              sql: |
                CASE
                  WHEN ${TABLE}.region IN (${qyra.parameters.region})
                  THEN ${TABLE}.revenue
                  ELSE 0
ENDmodels:
- name: orders
columns:
- name: filtered_revenue
meta:
dimension:
type: number
sql: |
CASE
WHEN ${TABLE}.region IN (${qyra.parameters.region})
THEN ${TABLE}.revenue
ELSE 0
ENDtype: model
name: orders
dimensions:
- name: filtered_revenue
type: number
sql: |
CASE
WHEN ${TABLE}.region IN (${qyra.parameters.region})
THEN ${TABLE}.revenue
ELSE 0
ENDIn this example, the filtered_revenue dimension will only show revenue for the regions selected in the region parameter.
In numeric dimension SQL
You can reference numeric parameters directly without casting:
models:
  - name: orders
    columns:
      - name: high_value_orders
        config:
          meta:
            dimension:
              type: boolean
sql: ${TABLE}.revenue >= ${qyra.parameters.min_revenue}models:
- name: orders
columns:
- name: high_value_orders
meta:
dimension:
type: boolean
sql: ${TABLE}.revenue >= ${qyra.parameters.min_revenue}type: model
name: orders
dimensions:
- name: high_value_orders
type: boolean
sql: ${TABLE}.revenue >= ${qyra.parameters.min_revenue}In this example, the high_value_orders dimension will be true for orders with revenue greater than or equal to the numeric min_revenue parameter value.
In metric SQL
You can reference parameters in the SQL definition of a metric:
models:
  - name: races
    config:
      meta:
        metrics:
          avg_distance_unit_param:
            type: average
            sql: |
              case
                when ${qyra.parameters.unit} = 'Miles'
                  then ${TABLE}.distance_miles
                when ${qyra.parameters.unit} = 'Kilometers'
                  then ${TABLE}.distance_km
endmodels:
- name: races
meta:
metrics:
avg_distance_unit_param:
type: average
sql: |
case
when ${qyra.parameters.unit} = 'Miles'
then ${TABLE}.distance_miles
when ${qyra.parameters.unit} = 'Kilometers'
then ${TABLE}.distance_km
endtype: model
name: races
metrics:
avg_distance_unit_param:
type: average
sql: |
case
when ${qyra.parameters.unit} = 'Miles'
then ${TABLE}.distance_miles
when ${qyra.parameters.unit} = 'Kilometers'
then ${TABLE}.distance_km
endIn this example, the avg_distance_unit_param metric will return an average of the race distance in miles when the unit parameter is set to Miles and Kilometers when it gets set to Kilometers.
Metric-based parameters
Parameters aren't just for filtering—they can swap entire metrics. Instead of creating multiple charts for each KPI, use a single parameter to dynamically control which metric is displayed. Users can toggle between total_revenue, won_revenue, deal_count, and win_rate from one dropdown.
models:
  - name: deals
    config:
      meta:
        metrics:
          selected_kpi:
            label: Selected KPI
            description: Dynamic metric that changes based on the KPI Metric parameter selection
            type: number
            sql: |
              CASE
                WHEN ${qyra.parameters.kpi_selector} = 'total_revenue' THEN ${deals.total_amount}
                WHEN ${qyra.parameters.kpi_selector} = 'won_revenue' THEN ${deals.total_won_amount}
                WHEN ${qyra.parameters.kpi_selector} = 'deal_count' THEN ${deals.unique_deals}
                WHEN ${qyra.parameters.kpi_selector} = 'win_rate' THEN ${deals.win_rate} * 100
ENDmodels:
- name: deals
meta:
metrics:
selected_kpi:
label: Selected KPI
description: Dynamic metric that changes based on the KPI Metric parameter selection
type: number
sql: |
CASE
WHEN ${qyra.parameters.kpi_selector} = 'total_revenue' THEN ${deals.total_amount}
WHEN ${qyra.parameters.kpi_selector} = 'won_revenue' THEN ${deals.total_won_amount}
WHEN ${qyra.parameters.kpi_selector} = 'deal_count' THEN ${deals.unique_deals}
WHEN ${qyra.parameters.kpi_selector} = 'win_rate' THEN ${deals.win_rate} * 100
ENDtype: model
name: deals
metrics:
selected_kpi:
label: Selected KPI
description: Dynamic metric that changes based on the KPI Metric parameter selection
type: number
sql: |
CASE
WHEN ${qyra.parameters.kpi_selector} = 'total_revenue' THEN ${deals.total_amount}
WHEN ${qyra.parameters.kpi_selector} = 'won_revenue' THEN ${deals.total_won_amount}
WHEN ${qyra.parameters.kpi_selector} = 'deal_count' THEN ${deals.unique_deals}
WHEN ${qyra.parameters.kpi_selector} = 'win_rate' THEN ${deals.win_rate} * 100
ENDIn this example, the selected_kpi metric dynamically returns different values based on the kpi_selector parameter. This allows you to build a single chart that can display multiple KPIs. See this in action on our demo site.
In table joins
You can use parameters in the SQL_ON clause of a table join. This includes both project-level parameters and model-level parameters from the joined table:
models:
  - name: orders
    config:
      meta:
        joins:
          - join: customers
            sql_on: |
              ${orders.customer_id} = ${customers.id}
AND ${customers.region} IN (${qyra.parameters.region})models:
- name: orders
meta:
joins:
- join: customers
sql_on: |
${orders.customer_id} = ${customers.id}
AND ${customers.region} IN (${qyra.parameters.region})type: model
name: orders
joins:
- join: customers
sql_on: |
${orders.customer_id} = ${customers.id}
AND ${customers.region} IN (${qyra.parameters.region})This join will only include customers from the regions selected in the project-level region parameter.
You can also reference model-level parameters from joined tables:
models:
  - name: orders
    config:
      meta:
        joins:
          - join: customers
            sql_on: |
              ${orders.customer_id} = ${customers.customer_id}
AND ${customers.status} = ${qyra.parameters.customers.customer_status}models:
- name: orders
meta:
joins:
- join: customers
sql_on: |
${orders.customer_id} = ${customers.customer_id}
AND ${customers.status} = ${qyra.parameters.customers.customer_status}type: model
name: orders
joins:
- join: customers
sql_on: |
${orders.customer_id} = ${customers.customer_id}
AND ${customers.status} = ${qyra.parameters.customers.customer_status}In this example, the join uses a model-level parameter customer_status defined in the customers model. This allows you to dynamically filter the joined data based on parameters specific to the joined table.
In sql_from for dynamic tables or schemas
Parameters are always rendered as quoted string literals, so you can't drop a parameter directly into a FROM clause to switch tables or schemas. To dynamically choose a table or schema at query time, use Liquid templating around the parameter reference.
If you don't care about quoting, you can interpolate the parameter directly into the identifier:
sql_from: "analytics_${qyra.parameters.sales.source_env}.fact_sales"If you need full control over the identifier (for example, to map parameter values to specific fully-qualified table names), use a Liquid case or if block wrapped in {% raw %} so Qyra doesn't try to render the parameter as a string:
sql_from: >
  {% raw %}{% case ld.parameters.sales.source_env %}
  {% when 'prod' %} analytics_prod.fact_sales
  {% when 'staging' %} analytics_staging.fact_sales
  {% when 'dev' %} analytics_dev.fact_sales
  {% else %} analytics_prod.fact_sales
{% endcase %}{% endraw %}sql_from: >
{% raw %}{% if ld.parameters.sales.source_env == 'prod' %} analytics_prod.fact_sales
{% elsif ld.parameters.sales.source_env == 'staging' %} analytics_staging.fact_sales
{% else %} analytics_dev.fact_sales
{% endif %}{% endraw %}The same pattern works for swapping schemas, databases, or any other identifier that can't be expressed as a quoted string.
In table calculations
You can reference parameters in table calculations:
-- Table calculation example
CASE
  WHEN ${orders.order_date} >= ${qyra.parameters.date_range_start}
  THEN ${orders.revenue}
  ELSE 0
END
This table calculation will only include revenue for orders placed on or after the date selected in the date_range parameter.
In additional dimensions
You can use parameters in custom dimension definitions:
models:
  - name: orders
    columns:
      - name: order_date
        config:
          meta:
            dimension:
              type: date
            additional_dimensions:
              is_after_cutoff_date:
                type: boolean
sql: ${order_date} >= ${qyra.parameters.date_range_start}models:
- name: orders
columns:
- name: order_date
meta:
dimension:
type: date
additional_dimensions:
is_after_cutoff_date:
type: boolean
sql: ${order_date} >= ${qyra.parameters.date_range_start}type: model
name: orders
dimensions:
- name: order_date
type: date
additional_dimensions:
is_after_cutoff_date:
type: boolean
sql: ${order_date} >= ${qyra.parameters.date_range_start}This additional dimension will indicate whether an order was placed on or after the date selected in the date_range parameter.
In SQL Runner
Parameters can also be used in SQL Runner queries:
SELECT
  order_id,
  order_date,
  revenue
FROM orders
WHERE region IN (${qyra.parameters.region})
  AND order_date >= ${qyra.parameters.date_range_start}
AND revenue >= ${qyra.parameters.min_revenue}This query will filter orders by the regions selected in the region parameter, by the date selected in the date_range parameter, and by orders with revenue greater than or equal to the numeric min_revenue parameter.
Model parameters from joined tables in dimensions
When working with joined tables, you can reference model-level parameters from the joined table in your dimension definitions:
models:
  - name: orders
    config:
      meta:
        joins:
          - join: customers
            sql_on: ${orders.customer_id} = ${customers.id}
    columns:
      - name: filtered_customer_revenue
        config:
          meta:
            dimension:
              type: number
              sql: |
                CASE
                  WHEN ${customers.segment} = ${qyra.parameters.customers.target_segment}
                  THEN ${TABLE}.revenue
                  ELSE 0
ENDmodels:
- name: orders
meta:
joins:
- join: customers
sql_on: ${orders.customer_id} = ${customers.id}
columns:
- name: filtered_customer_revenue
meta:
dimension:
type: number
sql: |
CASE
WHEN ${customers.segment} = ${qyra.parameters.customers.target_segment}
THEN ${TABLE}.revenue
ELSE 0
ENDtype: model
name: orders
joins:
- join: customers
sql_on: ${orders.customer_id} = ${customers.id}
dimensions:
- name: filtered_customer_revenue
type: number
sql: |
CASE
WHEN ${customers.segment} = ${qyra.parameters.customers.target_segment}
THEN ${TABLE}.revenue
ELSE 0
ENDIn this example, the filtered_customer_revenue dimension uses a model-level parameter target_segment from the joined customers model to conditionally show revenue.
Reserved parameters
Qyra provides built-in reserved parameters that are automatically available in every project. You don't need to define them in qyra.config.yml or in a model — they resolve from the current query context at runtime.
Reserved parameters appear in custom SQL autocomplete alongside your own parameters. They are surfaced as System variables in the autocomplete dropdown.
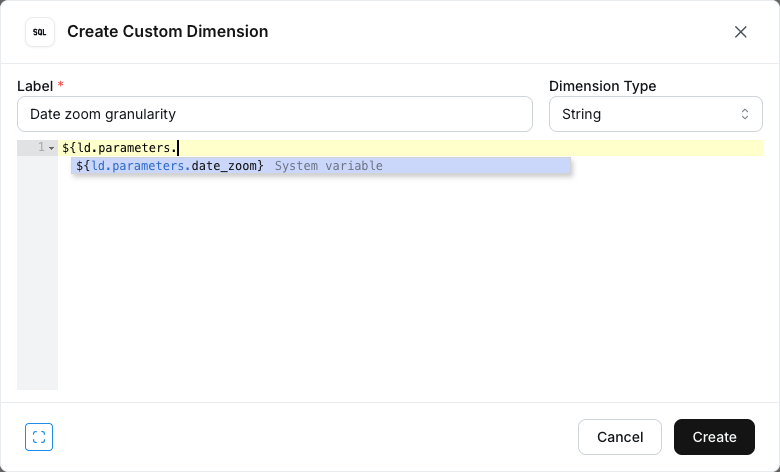
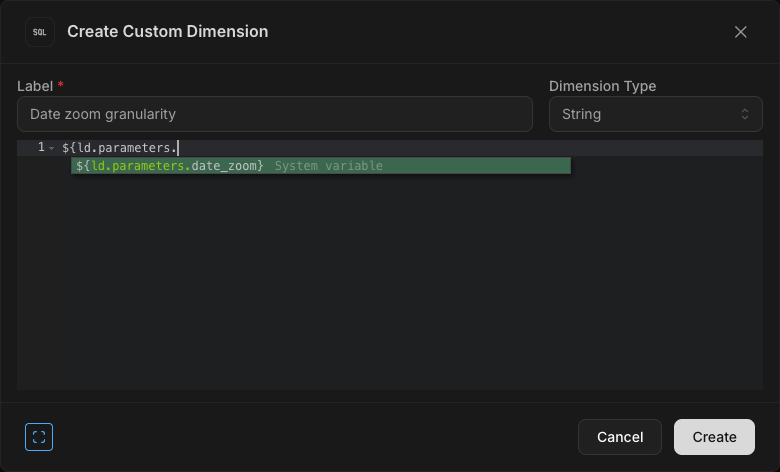
If you define a user parameter with the same name as a reserved parameter, your user parameter wins and shadows the reserved one. Avoid naming user parameters after reserved names unless you intend to override them.
date_zoom
Resolves to the currently selected date zoom granularity, lowercased (for example day, week, month, quarter, year, or a custom granularity name). When no date zoom is selected, the value is an empty string.
Reference it in custom SQL just like any other parameter:
${ld.parameters.date_zoom}This lets you branch SQL based on the dashboard's current granularity selection, including falling back to default logic when no granularity is selected:
CASE
  WHEN ${ld.parameters.date_zoom} = 'week'   THEN 'Weekly view'
  WHEN ${ld.parameters.date_zoom} = 'month'  THEN 'Monthly view'
  WHEN ${ld.parameters.date_zoom} = ''       THEN 'No date zoom applied'
  ELSE 'Other granularity'
END
The value tracks the granularity actually used to compile the query, so it stays in sync with what users see in the date zoom dropdown, including custom granularities.
Saving parameter values
Parameter values can be saved at both the chart and dashboard levels.
Saving values in charts
When you create a chart using parameters, you can save the specific parameter values with the chart. This means that when someone views the chart, they'll see the data filtered according to the saved parameter values.
To save parameter values with a chart:
- Create or edit a chart
- Set the parameter values as desired
- Save the chart
The parameter values will be saved with the chart and will be applied whenever the chart is viewed.
Saving values in dashboards
You can also save parameter values at the dashboard level, which allows you to create dashboards with consistent parameter values across all charts.
To save parameter values in a dashboard:
- Create or edit a dashboard
- Add charts to the dashboard
- Set the parameter values as desired
- Save the dashboard
The parameter values will be saved with the dashboard and will be applied to all charts on the dashboard that have parameterized fields.
Using parameters well
When using parameters:
- Use descriptive names: Choose parameter names that clearly indicate their purpose
- Provide default values: Set default values for parameters to ensure queries work even if users don't set parameter values
- Add descriptions: Include clear descriptions for parameters to help users understand their purpose
- Consider using options_from_dimension: For parameters that should match values in your data, use
options_from_dimensionto dynamically populate options - Consider performance: Be mindful of how parameters affect query performance, especially with large datasets