Content as code
Download charts, dashboards, spaces, agents, and roles as code, edit them, and upload them back
Choosing a workflow
There are two main approaches to working with content as code. You can mix and match these within your organization — for example, using disposable editing for quick changes and Git-managed dashboards for production-critical content.
| Disposable editing | Git-managed dashboards | |
|---|---|---|
| Source of truth | Qyra UI | Git repository |
| UI editing | Anyone can edit freely | Restricted to view-only for managed content |
| Version history | Qyra's built-in history | Full Git audit trail with diffs and blame |
| Review process | None required | Pull requests with approvals |
| Setup complexity | Minimal — just the CLI | Requires CI/CD and space permissions |
| Best for | Quick edits, AI-assisted changes, ad-hoc updates | Regulated environments, multi-instance deployments, teams that want strict change control |
Disposable editing (recommended)
Treat the downloaded YAML as temporary working files: download, edit by hand or with an AI agent, upload, then discard the local copies instead of committing them. This keeps the Qyra application as your source of truth while still giving you code-based, agent-assisted editing. See Editing dashboards with agents for the full workflow.
Git-managed dashboards
An alternative approach where your Git repository is the single source of truth for charts and dashboards. All changes flow through version control, and the UI is read-only for managed content.
When to use this workflow
- You want a full audit trail of every dashboard change via Git history
- You want to enforce review processes (pull requests, approvals) before changes reach production
- You're comfortable with all edits happening in code rather than the UI
- You want to validate dashboard changes in preview environments before merging
- You're deploying the same content across multiple Qyra instances
Lock down the UI
For this workflow to succeed, you need to prevent ad-hoc UI edits from drifting out of sync with your repository. Use space permissions to enforce this:
- Set the spaces containing your code-managed dashboards and charts to view-only for all non-admin roles
- This ensures the YAML files in your repository are always the definitive version of the content
You don't have to manage everything this way. Organize code-managed content into specific spaces with restricted permissions, and leave other spaces open for UI editing.
Making changes
The typical workflow for editing Git-managed dashboards:
- Branch — create a feature branch in your repository
- Preview — spin up a preview environment to test against
- Edit the YAML files — make changes to chart and dashboard files in the
qyra/directory. This is where AI coding assistants are especially useful — you can describe changes in natural language and have the assistant edit the YAML for you - Upload to the preview — run
qyra upload --forceto push your changes to the preview environment and verify everything looks right - Open a pull request — once the changes look good in the preview, commit and open a PR for review
- Merge and deploy — on merge to your main branch, a CI job runs
qyra deployandqyra upload --forceto push changes to production
CI/CD setup
To fully automate this workflow, set up two CI jobs:
- Deploy on merge to main — install the Qyra CLI and dbt, then run
qyra deploy(to sync the semantic layer) followed byqyra upload --force(to push chart and dashboard changes to production). You'll needQYRA_API_KEY,QYRA_URL, andQYRA_PROJECTconfigured as secrets in your CI environment. - Preview environments on PRs (optional) — automatically create a preview environment on every PR so reviewers can see dashboard changes before approving. On PR open or update, run
qyra start-previewandqyra upload --force, then post the preview link as a PR comment. On PR close, runqyra stop-previewto clean up.
See the Qyra CLI reference for full details on available commands.
qyra download
From the Qyra CLI, you can use the command qyra download to download all of the charts and dashboards from your Qyra project as code. All of the charts and dashboards will be written as .yml files to a qyra directory wherever you're running the command.
E.g. if you're running this command inside your dbt directory (eg: /home/javi/dbt) then it will create a folder (/home/javi/dbt/qyra). If you're running this command in /home/javi/documents it will create the folder in /home/javi/documents/qyra.
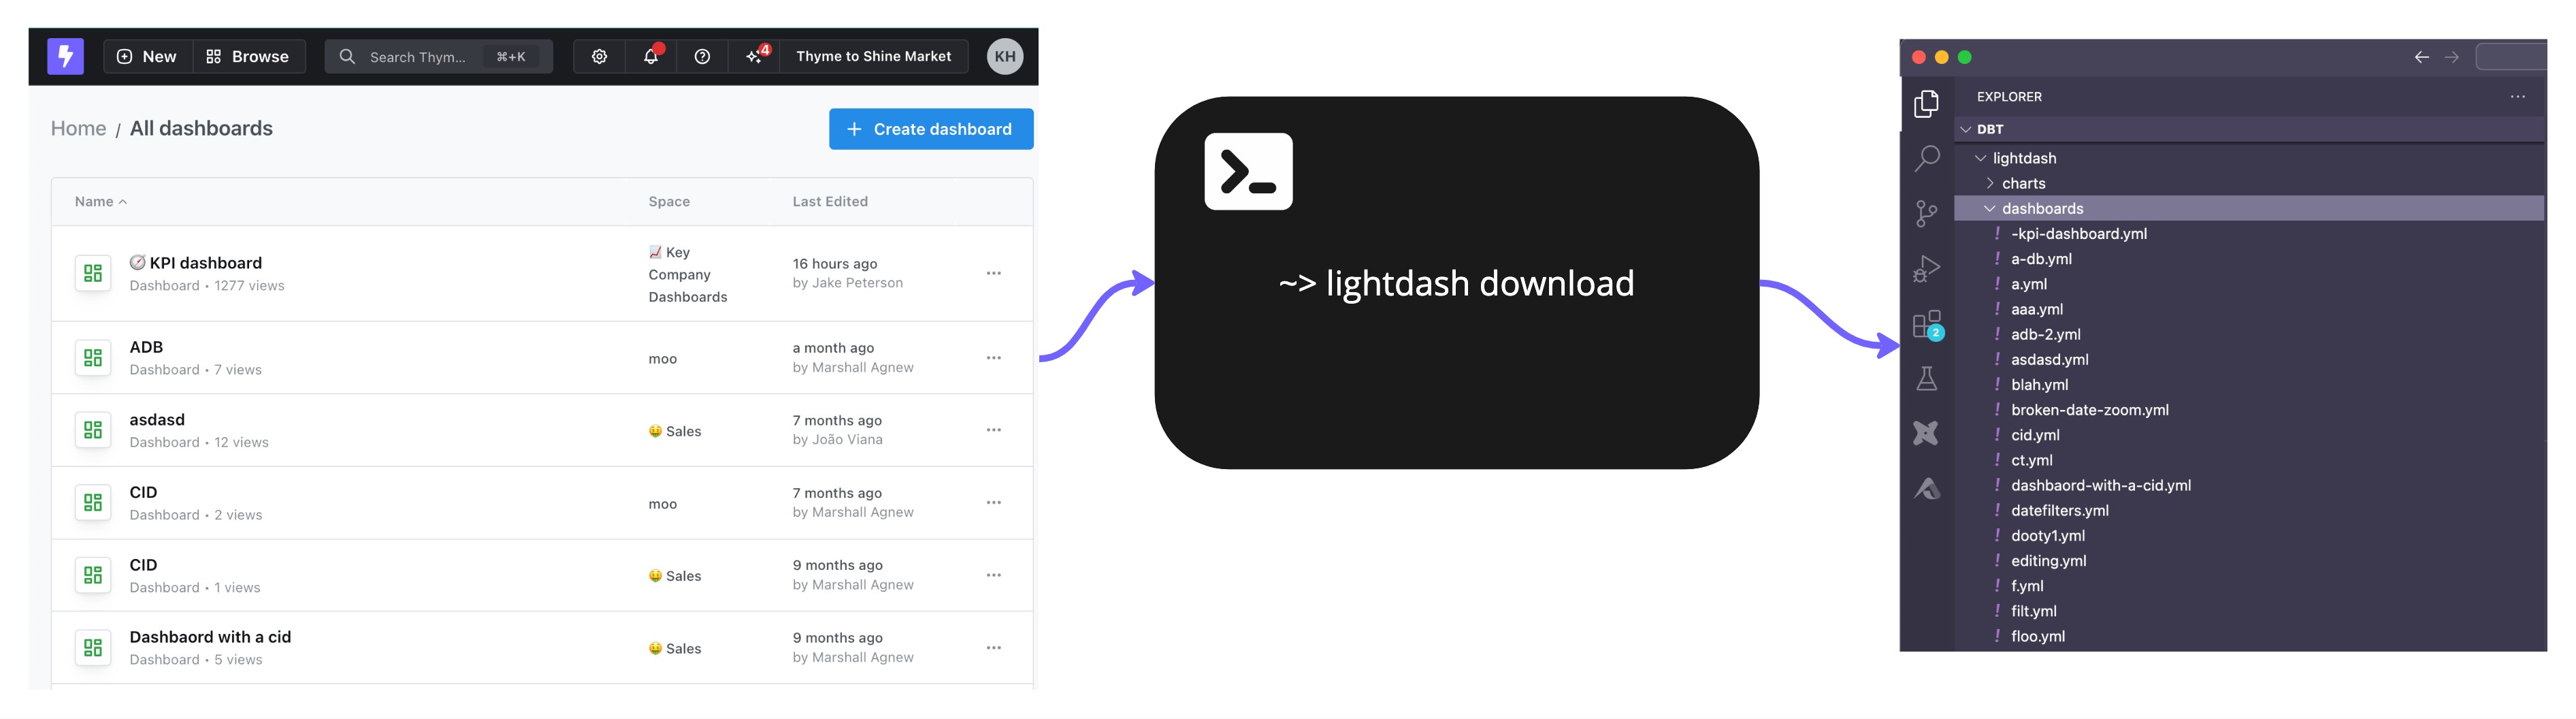
Running qyra download will overwrite any changes you have locally
For example:
- I run
qyra downloadand one of the charts that is downloaded isemea-revenue-per-month.yml - I make some changes to the
emea-revenue-per-month.ymlfile and save them - I do not upload my changes, they are just saved locally
- I run
qyra downloadagain - The changes I made to
emea-revenue-per-month.ymlwill be overwritten by the latest chart version downloaded from the Qyra application
The .qyra-metadata.json file
qyra download writes a .qyra-metadata.json file alongside your content — it's a local-only state file the CLI uses to detect which YAML files you've changed since the last download.
Add .qyra-metadata.json to your .gitignore. It's auto-generated on every download and will produce conflicts if committed.
Select specific items to download
Use qyra download -c or qyra download --charts to select specific charts
If you only want to download specific charts to manage as code, you can use the chart selector in the download command.
For example, if I only wanted to download a specific saved chart as code, I would run the command:
qyra download -c https://app.qyraflow.com/the-url-to-my-saved-chartYou can use the chart's SLUG, UUID, or the URL to the saved chart to select the chart.
Use qyra download -d or qyra download --dashboards to select specific dashboards
This will download the dashboard and all of the charts in the dashboard as code. For example, if I only wanted to download a specific dashboard as code, I would run the command:
qyra download -d https://app.qyraflow.com/the-url-to-my-dashboardYou can use the dashboard's SLUG, UUID, or the URL to the dashboard to select the dashboard.
To select multiple charts or dashboards, add a space between the items.
For example, this command would select two charts to download:
qyra download -c https://app.qyraflow.com/the-url-to-my-first-saved-chart https://app.qyraflow.com/the-url-to-my-second-saved-chartYou can combine charts and dashboards selection in a single command. For example, this command would download a chart and a dashboard:
qyra download -c https://app.qyraflow.com/the-url-to-my-first-saved-chart -d https://app.qyraflow.com/the-url-to-my-dashboardSpecify a download path
Use qyra download -p or qyra download --path to specify a directory to download to
By default, qyra download will create a new qyra directory in your current working directory and write the content there. You can customize the directory that you write to using qyra download -p. For example:
qyra download -p /Users/katiehindson/qyra/qyra-analytics/This will create: /Users/katiehindson/qyra/qyra-analytics/charts/ and /Users/katiehindson/qyra/qyra-analytics/dashboards and save the content to these new folders.
You can also use relative paths like:
qyra download -p ../Make downloaded charts portable across projects
Use qyra download --strip-pivot-series to download charts whose series config is portable across projects.
When a chart pivots on a dimension, its series config in the YAML hardcodes the pivot values present in the source project (for example, a status pivot might bake in series entries for active, paused, and archived). If you copy that YAML into another project that doesn't have the same pivot values, the upload either fails or renders with stale series.
--strip-pivot-series rewrites cartesian chart series to reference only the underlying x/y fields, drops the hardcoded per-value entries, and collapses duplicates. The resulting YAML is safe to reuse as a template across projects:
qyra download --strip-pivot-seriesThis flag only affects regular charts. SQL charts and dashboards are downloaded unchanged.
Download an entire project
Use qyra download --project <project UUID> to download all content from a specific project
Running qyra download will download all content from your current set project (set using qyra config set-project). But, you can download content from another project using qyra download --project my-project-uuid. For example:
qyra download --project 21eef0b9-5bae-40f3-851e-9554588e71a6You can find a project's UUID from your Qyra URL. For example, https://app.qyraflow.com/projects/123-project-uuid/. Here, the project UUID here is 123-project-uuid .
qyra upload
qyra upload updates any content as code to your project.
From the Qyra CLI, you can use the command qyra upload to upload any changes you've made to your charts or dashboards as code. To upload new charts that you've created as code to your Qyra project, you need to run qyra upload --force
Select specific items to upload
Use qyra upload -c or qyra upload --charts to select specific charts
For example, if I only wanted to upload a specific saved chart as code, I would run the command:
qyra upload -c my-saved-chart-slugYou must specify the chart using the chart's SLUG.
Use qyra upload -d or qyra upload --dashboards to select specific dashboards
For example, if I only wanted to upload a specific dashboard as code, I would run the command:
qyra upload -d my-dashboard-slugYou must specify the dashboard using the dashboard's SLUG.
Use --include-charts to upload chart changes when uploading dashboards
When uploading specific dashboards using -d, you can also include any chart changes referenced by those dashboards by adding the --include-charts flag:
qyra upload -d my-dashboard-slug --include-chartsThis automatically includes charts that are referenced in the dashboard tiles, ensuring that both dashboard and chart changes are uploaded together.
To select multiple charts or dashboards, add a space between the items
For example, this command would select two charts to upload:
qyra upload -c my-saved-chart-1-slug my-saved-chart-2-slugSpecify a path to upload from.
Use qyra upload -p or qyra upload --path to specify a directory to upload from.
By default, qyra upload will upload all items you have saved in the qyra directory in your current working directory. You can customize the directory that you upload from using qyra upload -p. For example:
qyra upload -p /Users/katiehindson/qyra/qyra-analytics/This will upload all content from: /Users/katiehindson/qyra/qyra-analytics/charts/ and /Users/katiehindson/qyra/qyra-analytics/dashboards.
You can also use relative paths like:
qyra download -p ../Specify a project to upload to
Use qyra upload --project <project UUID> to upload your content to a specific project.
Running qyra upload will upload all content to your current set project (set using qyra config set-project). But, you can upload content to another project using qyra upload --project my-project-uuid. For example:
qyra upload --project 21eef0b9-5bae-40f3-851e-9554588e71a6You can find a project's UUID from your Qyra URL. For example, https://app.qyraflow.com/projects/123-project-uuid/. Here, the project UUID here is 123-project-uuid .
Only content as code that you've made changes to will be uploaded
For example:
- I have a chart that I've downloaded as code called
total-sales-worldwide.ymlin myqyra/directory - I only make changes to that chart's .yml
- I run
qyra upload total-sales-worldwide.ymlis the only file that gets uploaded because it's the only file that I made changes to
For example:
- Katie has a chart that she's downloaded as code called
total-sales-worldwide.ymlin herqyra/directory - She doesn't make any changes to the chart as code
- Javi opens the same chart,
Total sales worldwide, in the Qyra application, makes some changes, and saves them - Now, Katie's
total-sales-worldwide.ymland theTotal sales worldwidechart in the application are different. - Katie runs
qyra upload - Katie's
total-sales-worldwide.ymldoes not get uploaded because she made no changes to the chart as code - Javi's changes to the
Total sales worldwidechart that he made in the Qyra application are not overwritten (the version he created is what we see in the Qyra application)
Content that's been downloaded as code can still be updated in the Qyra application
For example:
- There is a Qyra project called
Stellar Marketing - Priyanka runs
qyra downloadand downloads all of the project's content as code, including a chart calledTotal new clients - Jake opens the
Total new clientschart in the Qyra application and makes some changes - Priyanka doesn't run
qyra download, so thetotal-new-clients.ymlchart that Priyanka has as code is the old version of the chart, before Jake updated it. - Priyanka makes changes to
total-new-clients.ymlthen runsqyra uploadand uploads her changes and overwrites the changes that Jake made in the Qyra application. - Both Jake and Priyanka can update the same chart as code, or in the Qyra application.
What download and upload include
When you select a dashboard with -d, its dependencies follow it — automatically in some cases, behind a flag in others:
| Step | Content | Behavior |
|---|---|---|
| Download | Charts | Automatic |
| Download | Virtual views | Automatic |
| Download | Data apps | Automatic |
| Download | Custom chart types | Automatic |
| Upload | Charts | Requires --include-charts |
| Upload | Virtual views | Requires --include-virtual-views |
| Upload | Data apps | Automatic |
| Upload | Custom chart types | Requires --chart-types |
Charts that render with a custom chart type reference it by slug in their YAML, so downloading charts pulls their chart types into qyra/chart-types/ automatically. On upload the chart type must already exist in the target project — upload it with --chart-types first.
Selecting virtual views, data apps, or custom chart types on their own, rather than through a dashboard, is opt-in on both commands — see qyra download and qyra upload for those flags.
Rename a chart slug
Use qyra slug-update when you want to change a chart's URL slug without creating a new chart or breaking existing links:
qyra slug-update --from copy-of-total-orders --to total-ordersThe command performs both sides of the rename:
- It renames the chart in Qyra and keeps the previous slug as an alias.
- It updates the chart file and every supported reference in your local content-as-code directory.
Local updates include dashboard chart tiles, scheduled deliveries, alerts, Google Sheets syncs, language maps, filenames, and content metadata. The output lists each file that changed, including filename moves such as:
charts/copy-of-total-orders.yml -> charts/total-orders.yml
dashboards/executive-overview.yml
You do not need to upload after a successful rename: Qyra and your local files are already synchronized. For a Git-managed workflow, review the changes and commit them in the same pull request as any related content updates.
Preview the local changes before applying the rename with --dry-run:
qyra slug-update \
  --dry-run \
  --from copy-of-total-orders \
  --to total-orders
The dry run does not validate whether the server-side target slug is available. The real command performs permission, alias, and uniqueness checks before changing any local files.
How aliases protect existing content
When a chart changes from copy-of-total-orders to total-orders, Qyra keeps copy-of-total-orders as an alias for the same chart. This means:
- bookmarks, shared links, and CI-generated URLs using the old slug still work;
- a stale branch or checkout that uploads the old slug updates the existing chart instead of creating a duplicate;
- re-running the same rename is a safe no-op;
- you can rename the chart back to a previous slug without losing the newer slug—it becomes the alias instead.
If the API rename succeeds but the CLI cannot write the local files, the command reports that Qyra was updated. Fix the local filesystem issue and run the same command again; the server-side rename is idempotent and the CLI will finish updating the local files.
Use --path <path> when your content-as-code files are not in the default qyra/ directory:
qyra slug-update \
  --from copy-of-total-orders \
  --to total-orders \
  --path ./analytics-content
Slug renaming currently supports regular charts only. SQL chart, dashboard, space, and data app slugs are not renamed by this command.
Qyra content templates
You can use the qyra download and qyra upload commands to easily build templates for Qyra content and reuse these templates to build new or update existing projects.
Creating a new Qyra project from a Qyra template
If you're creating many dbt projects with similar models and want to easily spin up new versions of these projects, but with different table, field, or chart names, then you can use content as code to create a Qyra template of your project to reuse.
To do this, you'll need to:
- Take your existing Qyra project with all of the content that you want to copy.
- In the CLI, run
qyra downloadto download all of the content as code from the project. If your template includes pivoted charts, runqyra download --strip-pivot-seriesso the chart YAML doesn't hardcode pivot values from the source project. - Navigate to your new dbt project that you want to connect to Qyra.
- Copy-paste over the
qyra/directory inside your new dbt project with all of the content as code from your template project (or, only copy over the content that you want to use in your new project) - Once you're happy with your content, you're going to run
qyra config set-projectand select your new Qyra project from the list of projects - Then, you'll run
qyra upload --forceto upload all of the content as code you've added in yourqyra/directory to your new Qyra project
Adding content to an existing project from a Qyra template
Sometimes, if you're managing multiple dbt projects with similar models, you want to be able to easily create and manage the same charts and dashboards across all of the projects at the same time. You can do this with content as code to create a Qyra template project.
- You want to create a Qyra project that only contains all of the content that you want to share across your projects
- From your CLI, you can run
qyra downloadto download all of this content as code - You can then copy-paste the .yml files that get written across to any of the other dbt projects you have where you want to reuse the same charts and dashboards.
- Once you've copied over any content that you wanted to manage across projects, from the CLI, you should run
qyra config set-projectand select the project where you've added these new charts/dashboards as code to. - Then, you should run
qyra uploadto upload all of the new content as code.
Using community templates
Alongside making templates from your own project, you can also use templates from the qyra-templates repo to quickly build dashboards on top of common datasets.
For example, if you are using BigQuery as your data warehouse, you can use the community templates to build a usage tracking dashboard in a matter of minutes.
There are detailed instructions within the repo, but the general steps are as follows:
- Identify the content you wish to implement, and navigate to the relevant folder.
- Copy the content from the
Qyrafolder into your dbt project. - Run
qyra upload --forceto push your new content to Qyra.
Note that these templates still rely on access to an underlying dbt model containing the relevant data, you might need to create or adjust this following the instructions in the qyra-templates repo.
Space management
The spaceSlug field on every chart and dashboard YAML file controls which space the content lives in. This section covers everything you need to know about managing spaces through content as code.
How slugs work
Space slugs are lowercase and hyphenated. A space named "Data Team" has the slug data-team. When you download content, the correct spaceSlug value is written into the file automatically — so in most cases you don't need to construct slugs yourself.
spaceSlug: data-teamNested spaces
To place content in a sub-space, write the full path from the root space to the target space, separated by /:
# Places this dashboard in "Revenue", which is nested inside "Management"
spaceSlug: management/revenue

# Three levels deep: "EMEA" inside "Revenue" inside "Management"
spaceSlug: management/revenue/emea
Always use the full path from root to the target space. If you only provide the leaf slug (e.g. spaceSlug: revenue instead of spaceSlug: management/revenue), the CLI treats it as a root-level space and will create a new top-level space if one doesn't already exist with that slug.
Auto-creation on upload
You don't need to pre-create spaces in the UI. When you run qyra upload --force, the CLI will automatically create any spaces (and parent spaces) that don't already exist, using the path defined in spaceSlug.
For example, if neither management nor management/revenue exist in your project, uploading a file with spaceSlug: management/revenue will:
- Create the root space
management - Create
revenueas a child ofmanagement - Place the content inside
revenue
Moving content between spaces
To move a chart or dashboard to a different space, update the spaceSlug in the YAML file and re-upload:
# Before: content is in the "staging" space
spaceSlug: staging

# After: move it to the "production" space
spaceSlug: production
Then run:
qyra upload -c my-chart-slugMoving content via spaceSlug changes only the space assignment on upload. It does not affect the chart or dashboard's slug, name, or any other configuration.
.space.yml files
When you run qyra download, the CLI generates a .space.yml file for each space in your project. These files preserve the space's human-readable name and its direct access policy (per-user and per-group grants) so both survive a full download → edit → upload round-trip.
File format
contentType: space
version: 1
spaceName: "Orders analytics 🚀"
slug: orders-analytics
access:
  inheritParentPermissions: false
  projectMemberAccessRole: viewer
  users:
    - email: alex@ecom-store.com
      role: admin
    - email: sam@ecom-store.com
      role: editor
  groups:
    - name: Ecom analysts
role: editor| Field | Description |
|---|---|
contentType | Always space |
version | Schema version. 1 opts a file into the access-aware contract described below. Legacy files without version and access remain valid metadata-only files. |
spaceName | The original display name of the space (emoji, casing, and special characters preserved) |
slug | The full portable hierarchy path (e.g. management/revenue). Matches the value used in spaceSlug on charts and dashboards. |
access | Optional direct access policy. Omit to leave the current permissions untouched. |
access.inheritParentPermissions | Whether the space inherits access from its parent space. For root spaces this is always false. |
access.projectMemberAccessRole | Role granted to every project member (viewer, editor, admin), or null to grant no default project-wide access. |
access.users | Direct grants to human organization members, keyed by primary email. Each entry needs a role (viewer, editor, admin). Use users: [] to explicitly clear direct user grants. |
access.groups | Direct grants to organization groups, keyed by exact, case-sensitive name. Each entry needs a role. Use groups: [] to explicitly clear direct group grants. |
How access is applied on upload
When access is present, the CLI replaces the space's complete direct policy — inheritance, the all-project-members role, direct users, and direct groups. Empty arrays explicitly remove grants; effective inherited access and expanded group members are never serialized.
- Legacy files without
accessnever mutate permissions. They still updatespaceNameand other metadata, so the round-trip is safe on projects that haven't adopted the access contract yet. - Non-portable identities — users or groups that can't be safely resolved on the destination (missing primary email, deleted user, ambiguous group name, SCIM-owned identity that doesn't match) — cause the space to download as a legacy metadata-only file with a destructive-change warning rather than silently revoking access on the next upload. Re-uploading that file leaves the space's access unchanged.
- Ambiguous or deleted identities in an uploaded file produce explicit destructive warnings and cause the CLI to exit with a non-zero status rather than a silent no-op.
- Personal spaces that Qyra generates automatically are excluded from download and upload. SCIM-owned users and groups stay SCIM-owned; you cannot toggle their SCIM ownership through
.space.yml.
Authorization
Replacing a space's access requires actual manage:Space on the resolved space. A broad manage:ContentAsCode scope on its own does not bypass restricted-space authorization. The CLI also rejects uploads that would lock the uploader out of a space they still need to manage, and serializes access changes transactionally so concurrent permission revocations can't corrupt the space's ACL.
File naming and location
The filename is derived from the space name: {name-as-slug}.space.yml (for example, orders-analytics.space.yml).
There are three supported on-disk layouts, and qyra upload discovers all of them recursively:
- Flat, under
spaces/— the default for new flat downloads. Every.space.ymlfile is written toqyra/spaces/. - Flat, at the root — the legacy layout. Enable it on new downloads with
--root-spaces. - Nested — with
--nested, each.space.ymlfile lives inside its own space folder alongside that space'scharts/anddashboards/directories.
Existing files are always updated in their current location, so re-running qyra download never duplicates or automatically moves root-level, spaces/, or nested files.
Example flat layout after qyra download:
qyra/
├── spaces/
│   ├── orders-analytics.space.yml
│   └── marketing.space.yml
├── charts/
│   └── monthly-revenue.yml
└── dashboards/
└── executive-summary.ymlUpload ordering
qyra upload processes .space.yml files before dependent content (charts, dashboards, scheduled deliveries, and so on) so that a chart's target space always exists and has its final ACL before the chart is written. Parents in a nested hierarchy are processed before their descendants; missing spaces are created unless you pass --skip-space-create.
If you deploy organization-scoped content alongside project content, keep this order:
qyra upload --organizationqyra upload --spaces-only(or a full upload) to reconcile spaces- Project content (bare
qyra upload, or one filtered by--charts/--dashboards)
Controlling what runs
Full project downloads and uploads include spaces by default. Use:
--skip-spaces— skip spaces entirely on the current run. Useful when you only want to reconcile charts and dashboards.--spaces-only— download or upload only.space.ymlfiles. Handy for permission-only PRs and organization promotions.--root-spaces— write new flat downloads at theqyra/root instead ofqyra/spaces/(download-only; not combinable with--nested).
Filtered chart and dashboard operations (-c, -d) never reconcile unrelated space access. They still maintain metadata-only .space.yml files for the referenced spaces so names stay portable; an existing versioned access block is preserved rather than replaced by embedded metadata.
If the access-aware space endpoint is unavailable on the destination, a bare qyra download falls back to legacy metadata-only .space.yml files embedded in chart and dashboard responses. --spaces-only remains strict — it has no content response to fall back on and will surface the error.
Virtual views
You can manage virtual views as code alongside your charts and dashboards — the same qyra download / qyra upload workflow, opt-in with --include-virtual-views or --virtual-views <slug>. See Manage virtual views as code for the YAML contract, flags, and validation rules.
Dashboard as code yml reference
The yml configuration for dashboards as code is extensive. It covers both dashboards and individual charts. The best way to start is often to create your content in the Qyra UI, download it, and in most cases the structure will be fairly intuitive. Below are outlines of the structures you will find for both types of content to provide some additional context.
The examples below are not exhaustive, so if you have additional questions, you can always reach out to our support team for more details.
Dashboards
These are the simpler of the two content types.
Alongside the standard information, such as the name, description, updated at, slug and space information, you'll find details for each tile and the content that exists within it and detailed filter information.
Here's an example of a basic dashboard with three tiles and a couple of filters. We've added some comments for context!
name: My cool dashboard
description: Shows a few of our KPIs
ownerEmail: david@example.com
# The dashboard owner, by email. A string assigns that organization member,
# null clears the owner, and omitting the field leaves the owner unchanged.
updatedAt: "2025-01-01T10:15:47.406Z"
tiles:
    # Each tile is represented here with a co-ordinate
    # referencing their location on the dashboard grid.
  - x: 18
    "y": 5
    h: 6
    w: 18
    tabUuid: null
    type: saved_chart
    properties:
      title: ""
      hideTitle: false
      chartSlug: company-sales
      # Chart tiles always point towards a specific and unique chart slug
      # this will match up with the chart slug from the charts yml code.
    tileSlug: company-sales
  - x: 0
    "y": 5
    h: 6
    w: 18
    tabUuid: null
    type: saved_chart
    properties:
      title: ""
      hideTitle: false
      chartSlug: customer-counts
    tileSlug: customer-counts
  - x: 0
    "y": 0
    h: 5
    w: 36
    tabUuid: null
    type: markdown
    properties:
      title: My cool dashboard
      hideTitle: false
      content: |- # Markdown tiles have their config stored here under 'content'.
        This is an example of a markdown tile

        Emojis work here 🎉

        So do
        - bullet
        - points

        And so on...
filters:
  # Filters are split by whether they are performed
  # on a metric, dimension or table calculation.
  # Here we have two filters, both on dimensions.
  metrics: []
  dimensions:
    - target:
      # All of the config for a single filter exists under target.
      # Here we can see the underlying field that is being used to filter
      # and the default value assigned if one exists.
        fieldId: orders_date_day
        fieldName: date_day
        tableName: orders
      values:
        - 30
      disabled: false
      operator: inThePast
      settings:
        completed: false
        unitOfTime: days
      tileTargets: {}
    # Note that if we were just applying the filter to specific tiles
    # on the dash, we would see that info here.
    - target:
        fieldId: customers_is_verified
        fieldName: is_verified
        tableName: customers
      values: []
      disabled: false
      operator: notNull
      tileTargets: {}
  tableCalculations: []
tabs: []
config:
  isDateZoomDisabled: false # Boolean flag to control date zoom functionality
  dateZoomGranularities: # Available date zoom granularity options
    - Day
    - Week
    - Month
    - Quarter
    - Year
  defaultDateZoomGranularity: Month # Default granularity setting when dashboard loads
  dateZoomConfig: # Named date zoom controls and which charts each one governs
    controls: # Each control is a pill in the dashboard toolbar
      - uuid: 1f0a8c2e-7b3d-4a9f-bf21-2c6e9d4a1b00
        name: Revenue zoom # Label shown on the control pill
        granularity: Week # Default granularity for this control
        hidden: false # Optional; when true the control's grain applies but the pill is hidden from viewers
    tileTargets: # Maps a chart tile (by its slug) to the control that governs it
      company-sales: # Tile slug, matching one of the chart tiles above
        controlUuid: 1f0a8c2e-7b3d-4a9f-bf21-2c6e9d4a1b00 # Must match a control above
        fieldId: orders_order_date # Date field the zoom applies to on this chart
        tableName: orders
slug: my-cool-dashboard
spaceSlug: my-space
version: 1
downloadedAt: "2025-01-02T10:15:47.406Z"
# Verification fields (only present if the dashboard has been verified):
verification:
  # Read-only audit info, ignored on upload.
  verifiedAt: "2025-01-02T09:30:00.000Z"
  verifiedBy:
    firstName: David
    lastName: Attenborough
    userUuid: b264d83a-9000-426a-85ec-3f9c20f368ce
verified: true
# `verified` is the writable flag. Set to true/false to verify/unverify on upload,
# or omit to leave verification state unchanged.
# See /explore/verified-content for full semantics.ownerEmail sets the dashboard owner. Download writes the current owner's email, and upload resolves it back to a member of your organization, so ownership survives a move between projects or instances. If the email matches nobody in the organization, the upload still succeeds with a warning and the owner is left unchanged.
Charts
Charts store a large amount of configuration, and so are more complex and more variable that what you will find within the dashboard yml files.
Again, you will find basic information such as the name, description, updated at, slug and space information. But on top of that we also store all of the possible configuration you might have included in a chart. This includes things like:
- Dimensions
- Metrics
- Custom Fields
- Table Calculations
- Filters
- Visualization Configuration
- Formatting
- Sorting
Each of the above can have a number of sub categories of information. With that in mind, below is an example highlighting most of the above options, but you might come across variances depending on your exact chart configs!
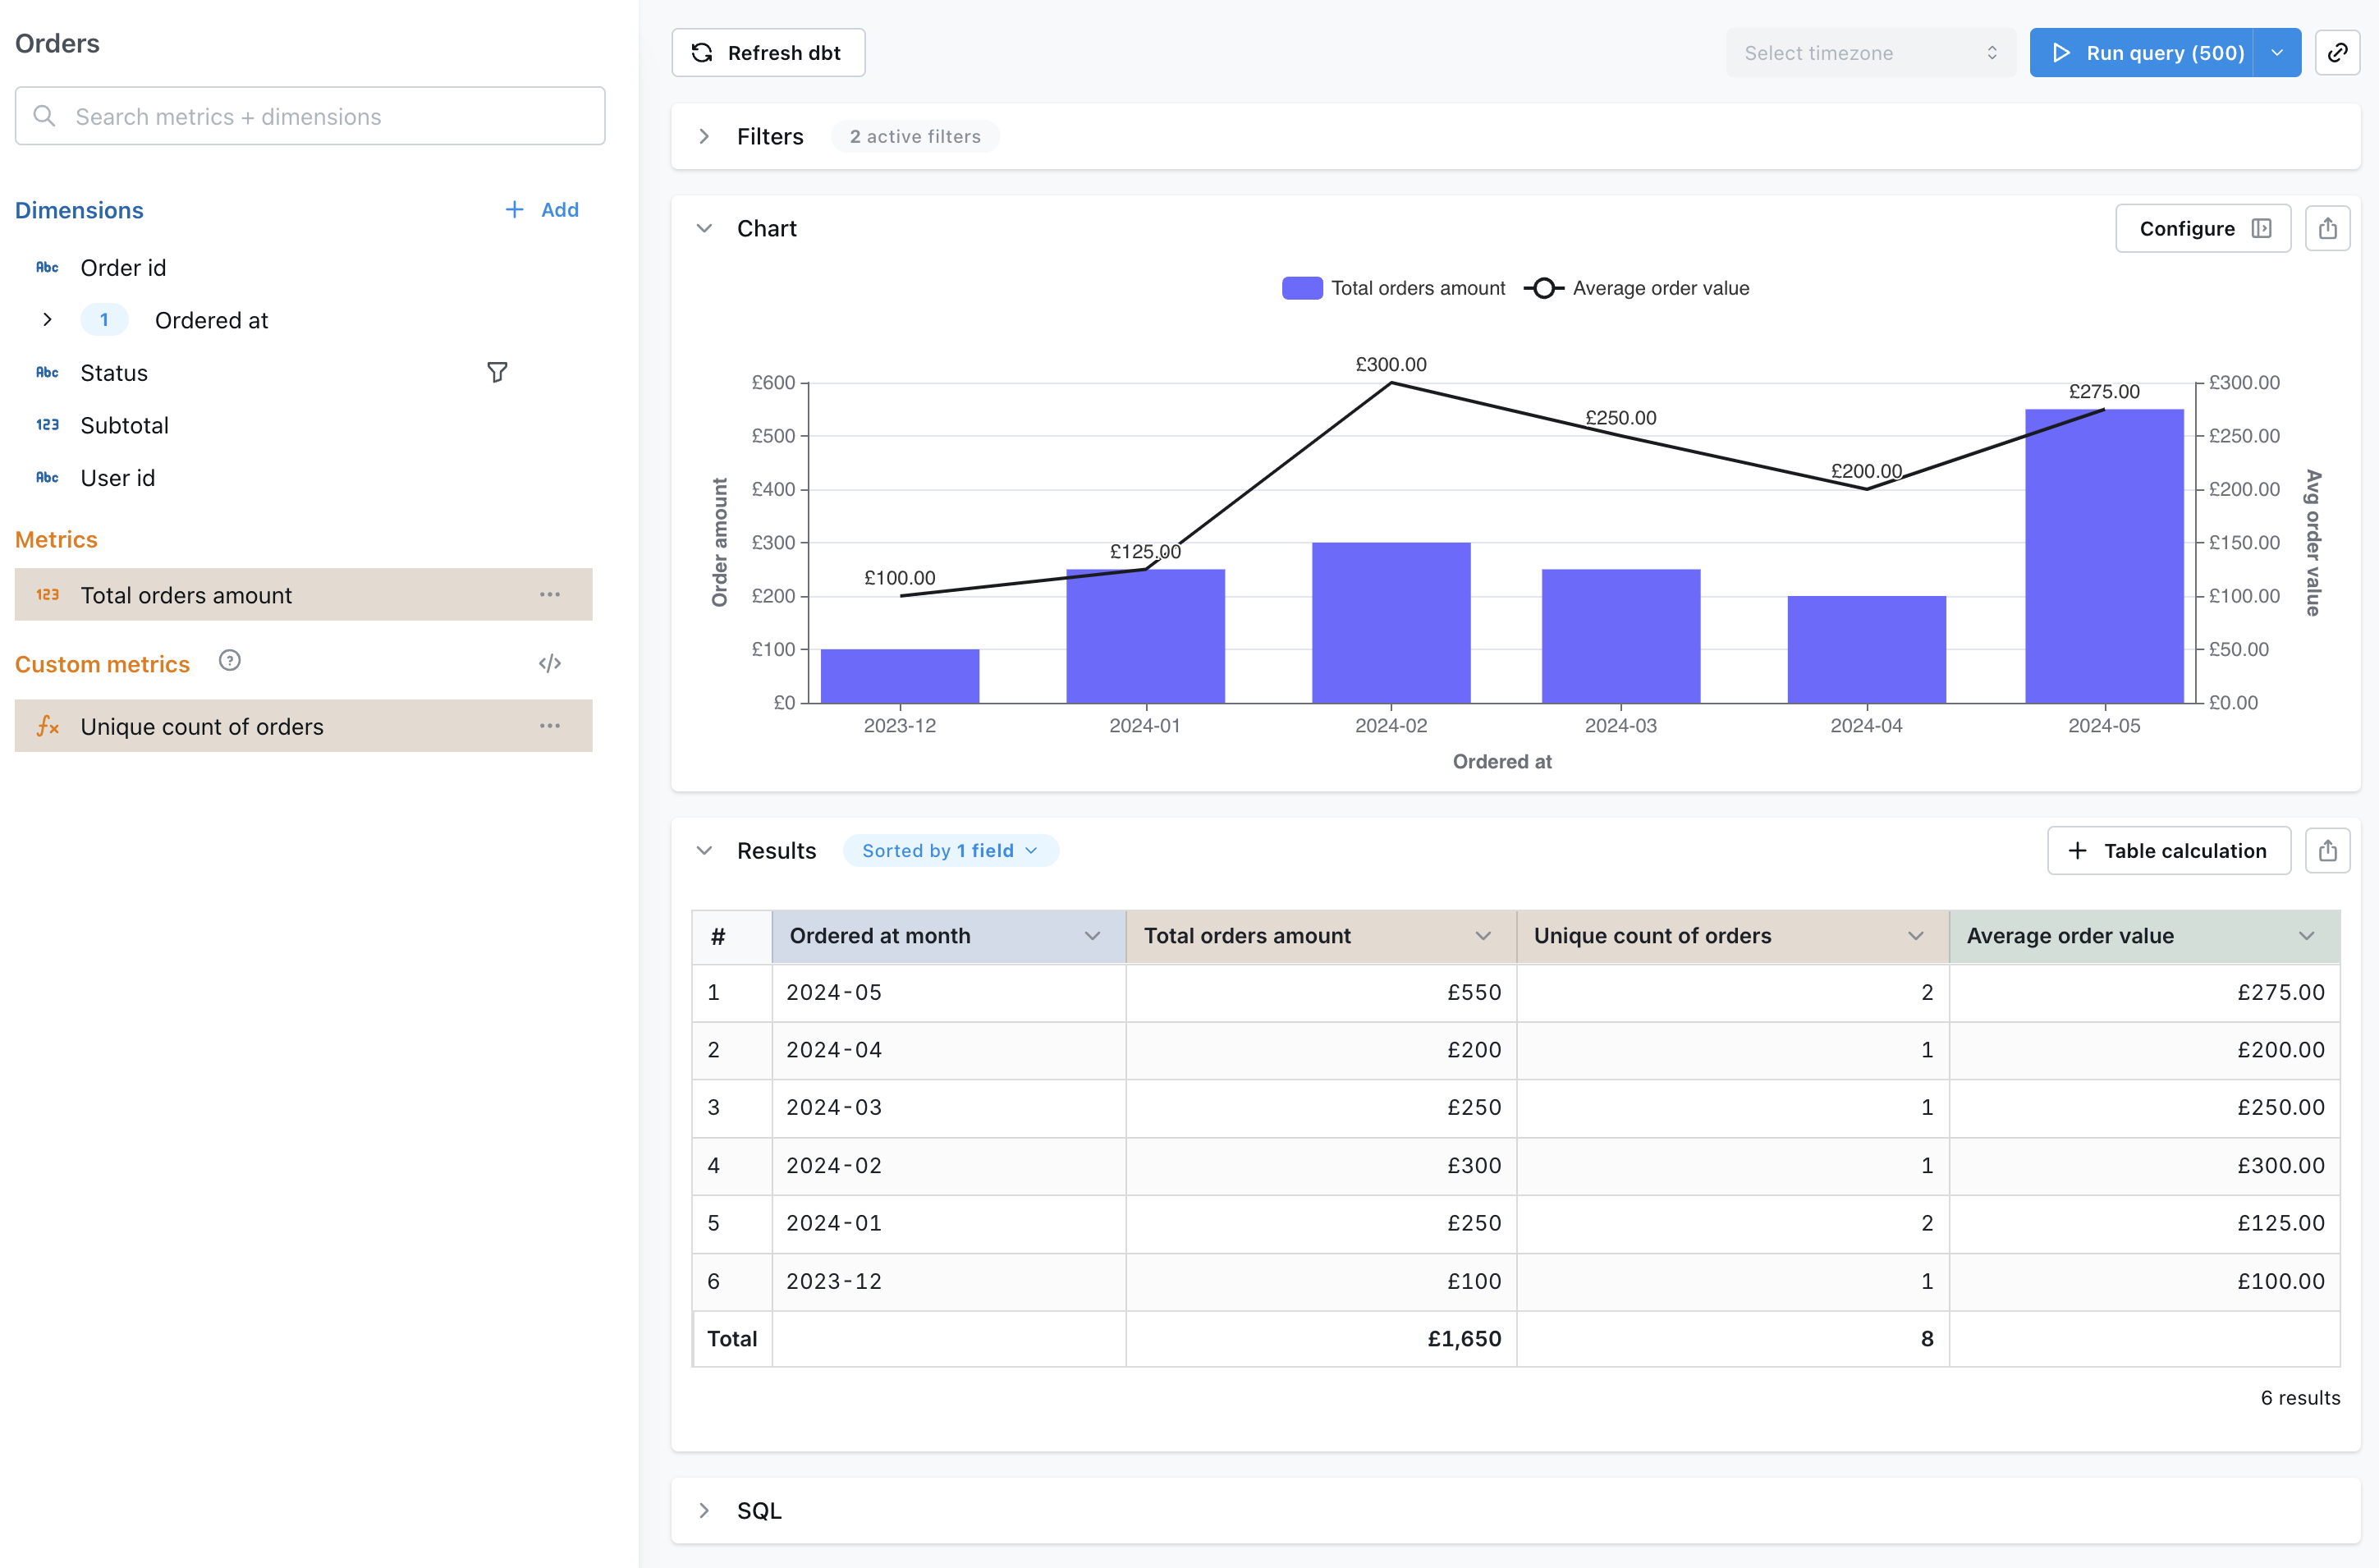
Here's an image of the chart that we have generated code for, and just below that is the code itself.
name: My cool chart
description: Shows sales since December 2023
tableName: orders
updatedAt: "2024-02-12T18:12:03.345Z"
metricQuery:
  # metricQuery stores all the information that
  # allows us to generate the results set.
  exploreName: orders
  dimensions:
    - orders_ordered_at_month
  metrics:
    - orders_total_orders_amount
    - orders_order_id_unique_count_of_orders
  filters:
    dimensions:
      and:
        # here we list all 'and' type filters
        # note we might also have 'or' type filters under an 'or' option
        - target:
            fieldId: orders_ordered_at_month
          values:
            - 2023-12
          operator: greaterThanOrEqual
          required: false

        - target:
            fieldId: orders_status
          values:
            - shipped
            - completed
            - placed
          operator: equals
          required: false
  sorts:
    - fieldId: orders_ordered_at_month
      descending: true
  limit: 500
  metricOverrides:
    # Metric overrides are often in the form of formatting changes.
    # here we are changing a basic number to a currency.
    orders_total_orders_amount:
      formatOptions:
        type: currency
        round: 0
        currency: GBP
        separator: default
        # `compact` accepts a fixed suffix (`thousands`, `millions`,
        # `billions`, `trillions`) or `auto` to pick the K/M/B/T
        # suffix dynamically based on each value's magnitude.
        # `auto` is only valid on `number` and `currency` types.
        compact: auto
  tableCalculations:
    - name: average_order_value_1
      displayName: Average order value
      sql: >- # Table calculation config is stored directly in yml
        ${orders.total_orders_amount}/${orders.order_id_unique_count_of_orders}
      format:
        type: currency
        round: 2
        currency: GBP
        separator: default
      type: number
  additionalMetrics:
    # This is an example of a custom metric that
    # has been added by the user in the UI
    - name: order_id_unique_count_of_orders
      label: Unique count of orders
      description: "Count distinct of Order id on the table Orders"
      sql: ${TABLE}.order_id
      table: orders
      type: count_distinct
      baseDimensionName: order_id
      formatOptions:
        type: default
        separator: default
  customDimensions: []
chartConfig:
    # Here is where all the config is stored to
    # translate your results set into a chart.
    # Note that this is the section that changes the most
    # with different chart types, but it's usually fairly
    # intuitive to understand!
  type: cartesian
  config:
    layout:
      xField: orders_ordered_at_month
      yField:
        - orders_total_orders_amount
        - average_order_value_1
    eChartsConfig:
      yAxis:
        - name: Order amount
        - name: Avg order value
          # Optional: force a minimum step between axis ticks
          # (e.g. 1 to keep integer-only tick labels). Also
          # supported on xAxis for numeric x-axes.
          minInterval: 1
      series:
        # Here you can see all of the details around the chart config,
        # I have a complex dual axis chart here, with both bars and lines.
        - type: bar
          encode:
            xRef:
              field: orders_ordered_at_month
            yRef:
              field: orders_total_orders_amount
          yAxisIndex: 0
          isFilteredOut: false
        - type: line
          label:
            show: true
            position: top
          encode:
            xRef:
              field: orders_ordered_at_month
            yRef:
              field: average_order_value_1
          yAxisIndex: 1
            # This index indicates that this is the right hand side y axis.
          isFilteredOut: false
      tooltip: "" # If I had custom tooltip config, it would show up here!
slug: my-cool-chart
tableConfig:
  columnOrder:
    - orders_ordered_at_month
    - orders_total_orders_amount
    - orders_order_id_unique_count_of_orders
    - average_order_value_1
spaceSlug: my-space
version: 1
downloadedAt: "2025-04-09T10:44:01.104Z"
# Verification fields (only present if the chart has been verified):
verification:
  # Read-only audit info, ignored on upload.
  verifiedAt: "2025-04-09T08:15:00.000Z"
  verifiedBy:
    firstName: David
    lastName: Attenborough
    userUuid: b264d83a-9000-426a-85ec-3f9c20f368ce
verified: true
# `verified` is the writable flag. Set to true/false to verify/unverify on upload,
# or omit to leave verification state unchanged.
# See /explore/verified-content for full semantics.SQL runner charts
Charts built with the SQL runner are also supported in dashboards as code. They are downloaded and uploaded alongside your regular charts when you run qyra download and qyra upload.
There are a few differences to be aware of compared to explore-based charts:
- The YAML file uses
contentType: sql_chart(explore-based charts don't include acontentType). - Instead of a
metricQuery, SQL charts store the rawsqlstring, alimit, and achartKind(e.g.vertical_bar,line,pie,table,big_number). - Visualization options live under
config(rather thanchartConfig) and follow the SQL runner's chart structure. - On a dashboard, SQL chart tiles use
type: sql_chart(rather thantype: saved_chart). ThechartSlugfield still references the SQL chart by its slug.
Here's a minimal example of a SQL runner chart as code:
name: Orders by status
description: Order counts grouped by status
slug: orders-by-status
contentType: sql_chart
sql: |-
  SELECT status, COUNT(*) AS order_count
  FROM orders
  GROUP BY status
limit: 500
chartKind: vertical_bar
config:
  type: bar
  # SQL runner visualization config (axes, series, formatting, etc.)
spaceSlug: my-space
version: 1
updatedAt: "2025-06-01T10:15:47.406Z"
downloadedAt: "2025-06-01T10:15:47.406Z"And the matching tile entry on a dashboard:
- x: 0
  "y": 0
  h: 6
  w: 18
  tabUuid: null
  type: sql_chart
  properties:
    title: ""
    hideTitle: false
    chartSlug: orders-by-status
tileSlug: orders-by-statusAI agents as code
AI agent configuration can also be managed as code and promoted between projects with the same qyra download / qyra upload workflow used for charts and dashboards. This is useful for keeping agent instructions and tags under review in Git, and for copying a working agent from a preview or staging project into production.
Agent config as code is opt-in: a bare qyra download does not include agents. See AI agents as code for the full guide, including the YAML schema, CLI flags, and what runtime state stays in the target environment.
Organization content as code
Custom roles, users, groups, and data app themes are organization-scoped rather than project-scoped, so they move through the --organization mode of qyra download and qyra upload rather than the project workflow above. Both require an organization admin.
A single qyra download --organization writes every organization resource to a top-level folder in your working directory:
qyra/
  custom-roles/
    <role-slug>.yml
  users/
    <email-slug>.yml
  groups/
    <group-slug>.yml
  themes/
    <theme-slug>/
      qyra-theme.yml
      css/
      fonts/
      images/
instructions/qyra upload --organization preflights every local theme package, then applies resources sequentially in dependency order: custom roles first, then users, groups, and themes. A failed phase prevents later phases from running, so a user file can safely reference a custom role added in the same commit, and a group file can safely list a user added in the same commit. One invalid theme package prevents any organization resource from changing.
Organization mode cannot be combined with project-content flags such as --charts, --dashboards, --project, --nested, or --force. Uploads never delete resources in Qyra — remove unwanted roles, users, groups, and themes in the UI.
Custom roles as code
Custom roles are managed as code, keyed by role name.
When to use it
- Version-control your organization's custom roles alongside charts and dashboards.
- Copy a role from one Qyra instance (for example, staging) to another (production) without recreating it by hand in the UI.
- Review role changes in a pull request before they hit the org.
YAML contract
Each custom role serializes to a single file under qyra/custom-roles/<role-slug>.yml:
version: 1
name: analytics-viewer
description: Read-only access to analytics content
level: organization
scopes:
  - view:Dashboard
  - view:SavedChart
- view:Space| Field | Description |
|---|---|
version | Format version. Currently always 1. |
name | The role's display name. This is the portable identity — a role is matched to an existing role by exact name within the organization. |
description | Optional human-readable description. Set to null to clear an existing description. |
level | Either organization or project. Determines which scopes are allowed. Immutable — once a role is created, its level cannot be changed via upload. |
scopes | The list of scope grants for the role. See the scope reference for available scopes. |
The filename is derived from the role name; the CLI creates safe filenames and disambiguates collisions automatically. A missing or empty custom-roles/ directory is a no-op.
Download and upload
Download writes every user-defined custom role in your organization to qyra/custom-roles/*.yml. System roles are not included.
For each file in qyra/custom-roles/, the backend resolves the role by name and returns one of three outcomes:
- Created — no role with that name exists yet, so a new one is created.
- Updated — the role exists and either the description or the set of scopes has changed.
- Unchanged — the role exists and already matches the file. No write is performed.
Uploads are per-file. A malformed or invalid file is reported with its file path and the error message from the backend, and the remaining files continue to process. If any file fails validation, the CLI exits with a non-zero status.
Permissions and validation
- The backend validates the role's version, name, description, level, and scopes on every upload. It rejects unknown fields, unsupported versions, unknown scopes, and scopes that aren't allowed at the role's level.
- The role level is immutable — you cannot change an existing organization role into a project role (or vice versa) by editing the YAML and uploading. Create a new role instead.
For backwards compatibility, an existing role may retain a legacy scope that is no longer assignable at its level; downloading and re-uploading such a role is a no-op. Scope-level validation is applied only to newly added scopes.
Users as code
Organization users serialize as portable YAML records keyed by their normalized primary email.
Credentials are never portable. Users as code does not carry passwords, SSO tokens, or session state — users continue to authenticate through your instance's existing password, SSO, or invitation flows. Uploading a user record only reconciles their organization role and active/disabled state; it never adds or removes an authentication method.
When to use it
- Version-control organization membership and role assignments.
- Promote a curated user list from a staging instance to production.
- Review role changes (for example, promoting someone to admin) in a pull request before applying them.
YAML contract
Each user serializes to a single file under qyra/users/<email-slug>.yml:
version: 1
email: alex@ecom-store.com
disabled: false
role:
  type: system
  name: editor
To assign a custom role, reference it by its exact organization-level name:
version: 1
email: taylor@ecom-store.com
disabled: false
role:
  type: custom
name: analytics-viewer| Field | Description |
|---|---|
version | Format version. Currently always 1. |
email | The user's primary email address. Normalized to lowercase and used as the portable identity — a user is matched to an existing member by exact email within the organization. |
disabled | true to deactivate the member, false to keep them active. Uploads never disable the last enabled authenticated admin. |
role.type | Either system or custom. system uses one of the built-in roles (member, viewer, interactive_viewer, editor, developer, admin); custom references a user-defined role. |
role.name | For system, the built-in role name. For custom, the exact organization-level custom role name — the referenced role must exist, or be created in the same upload's custom-roles phase. |
additionalRoles | Optional. Extra organization-level custom roles held on top of role, when custom roles are enabled. Each entry is {"{"{"}"} type: custom, name: <role name> {"}"}. Omitted on download when the user holds a single role. |
With custom roles enabled, a member with a system role plus extra custom roles serializes as:
version: 1
email: sam@ecom-store.com
disabled: false
role:
  type: system
  name: viewer
additionalRoles:
  - type: custom
    name: roadmap-viewer
  - type: custom
name: sql-runnerThe file describes the member's complete organization role set: uploading a file without additionalRoles for a member who currently holds extra roles removes those extras. Uploads that contain additionalRoles require custom roles to be enabled for the organization (the file fails with 403 otherwise), and instances that do not support the field reject it rather than silently dropping it.
Lifecycle status — whether a user has authenticated yet, whether they have a valid invitation — is derived from the destination user during upload and is not declared in YAML.
Download and upload
Download writes every organization member to qyra/users/*.yml. Uploads reconcile each file:
- Created — no member with that email exists, so the member is added and staged as awaiting authentication.
- Updated — the member exists and their role or
disabledstate has changed. - Unchanged — the member exists and already matches the file.
Omitting a user file does not remove the member from your organization — deactivate or delete users in the UI.
Sending invitations
Invitations are a separate, opt-in side effect. By default, users authenticate through your instance's existing domain, SSO, or manually triggered invitation flows. To send an invitation email as part of an upload, add --send-invites:
qyra upload --organization --send-invites--send-invites only sends invitations to eligible staged users. Authenticated users, disabled users, and users with a still-valid invitation are skipped.
Permissions and safety
- Uploads enforce the organization boundary — a user file cannot move a member into a different organization.
- Uploads preserve the admin invariant. Promotions to admin are processed before demotions and disables, and the backend rejects any individual operation that would leave the organization without an enabled authenticated admin.
Groups as code
Organization groups serialize as portable YAML records keyed by the exact, case-sensitive group name.
When to use it
- Version-control group membership alongside custom roles and users.
- Promote a group configuration from staging to production.
- Review membership changes in a pull request before they are applied.
YAML contract
Each group serializes to a single file under qyra/groups/<group-slug>.yml:
version: 1
name: Ecom Finance
members:
  - alex@ecom-store.com
  - taylor@ecom-store.com
An empty group is represented explicitly as members: [].
| Field | Description |
|---|---|
version | Format version. Currently always 1. |
name | The group's exact display name. This is the portable identity — a group is matched to an existing group by exact, case-sensitive name. Renaming a group in YAML creates a new group; the original group is left intact. |
members | List of primary email addresses. Every email must resolve to an existing, non-internal user in the destination organization before any mutation begins. |
Group files exclude UUIDs, project roles, space access, AI-agent access, user attributes, and ownership metadata — those are managed in the UI.
Download and upload
Download writes every group and its membership to qyra/groups/*.yml. Uploads reconcile each file:
- Created — no group with that name exists, so a new group is created with the listed members.
- Updated — the group exists and its membership set differs; the complete membership is replaced atomically.
- Unchanged — the group exists and its membership already matches the file.
If any listed email cannot be resolved to a user in the destination organization, the group's mutation is rejected atomically — membership is never partially applied.
Groups feature disabled. If the groups feature is turned off on the destination instance, qyra download --organization skips the groups folder. Run with --verbose to see an explanation.
SCIM-managed groups. Groups do not record management provenance, so content as code and SCIM should not manage the same group. If a group is provisioned by SCIM, keep managing it through SCIM and don't add a matching file under qyra/groups/.
Themes as code
Unlike the other three, a data app theme is a strict multi-file package under qyra/themes/<slug>/ rather than a single YAML document. Organization download exports UI-created themes into that layout; organization upload creates or updates themes by manifest slug, skips unchanged packages, and leaves a remote theme alone when its local directory is absent.
Theme upload does not change the organization default, and each theme import is atomic even though a multi-theme upload is not one transaction. See Themes as code for the manifest, supported assets, validation limits, and how to evaluate a theme change.
Editing with AI agents
You can use AI coding assistants like Cursor, Claude Code, and Codex to create and edit charts using natural language instead of clicking through the UI.
See Editing dashboards with agents for the full agent workflow, including the recommended practice of treating downloaded files as temporary rather than committing them.
Validate content YAML in your editor
Set up JSON schema validation in your editor so chart and dashboard YAML is checked — with autocomplete and inline errors — as you write it. See Set up VS Code for the schema configuration.