Connect your warehouse and dbt project
Connection settings for every supported warehouse, plus every way to import a dbt project
To setup your Qyra connection you'll need to:
You can see a list of every time your project is compiled by visiting the project compilation history page.
Open up your Qyra instance to get started.
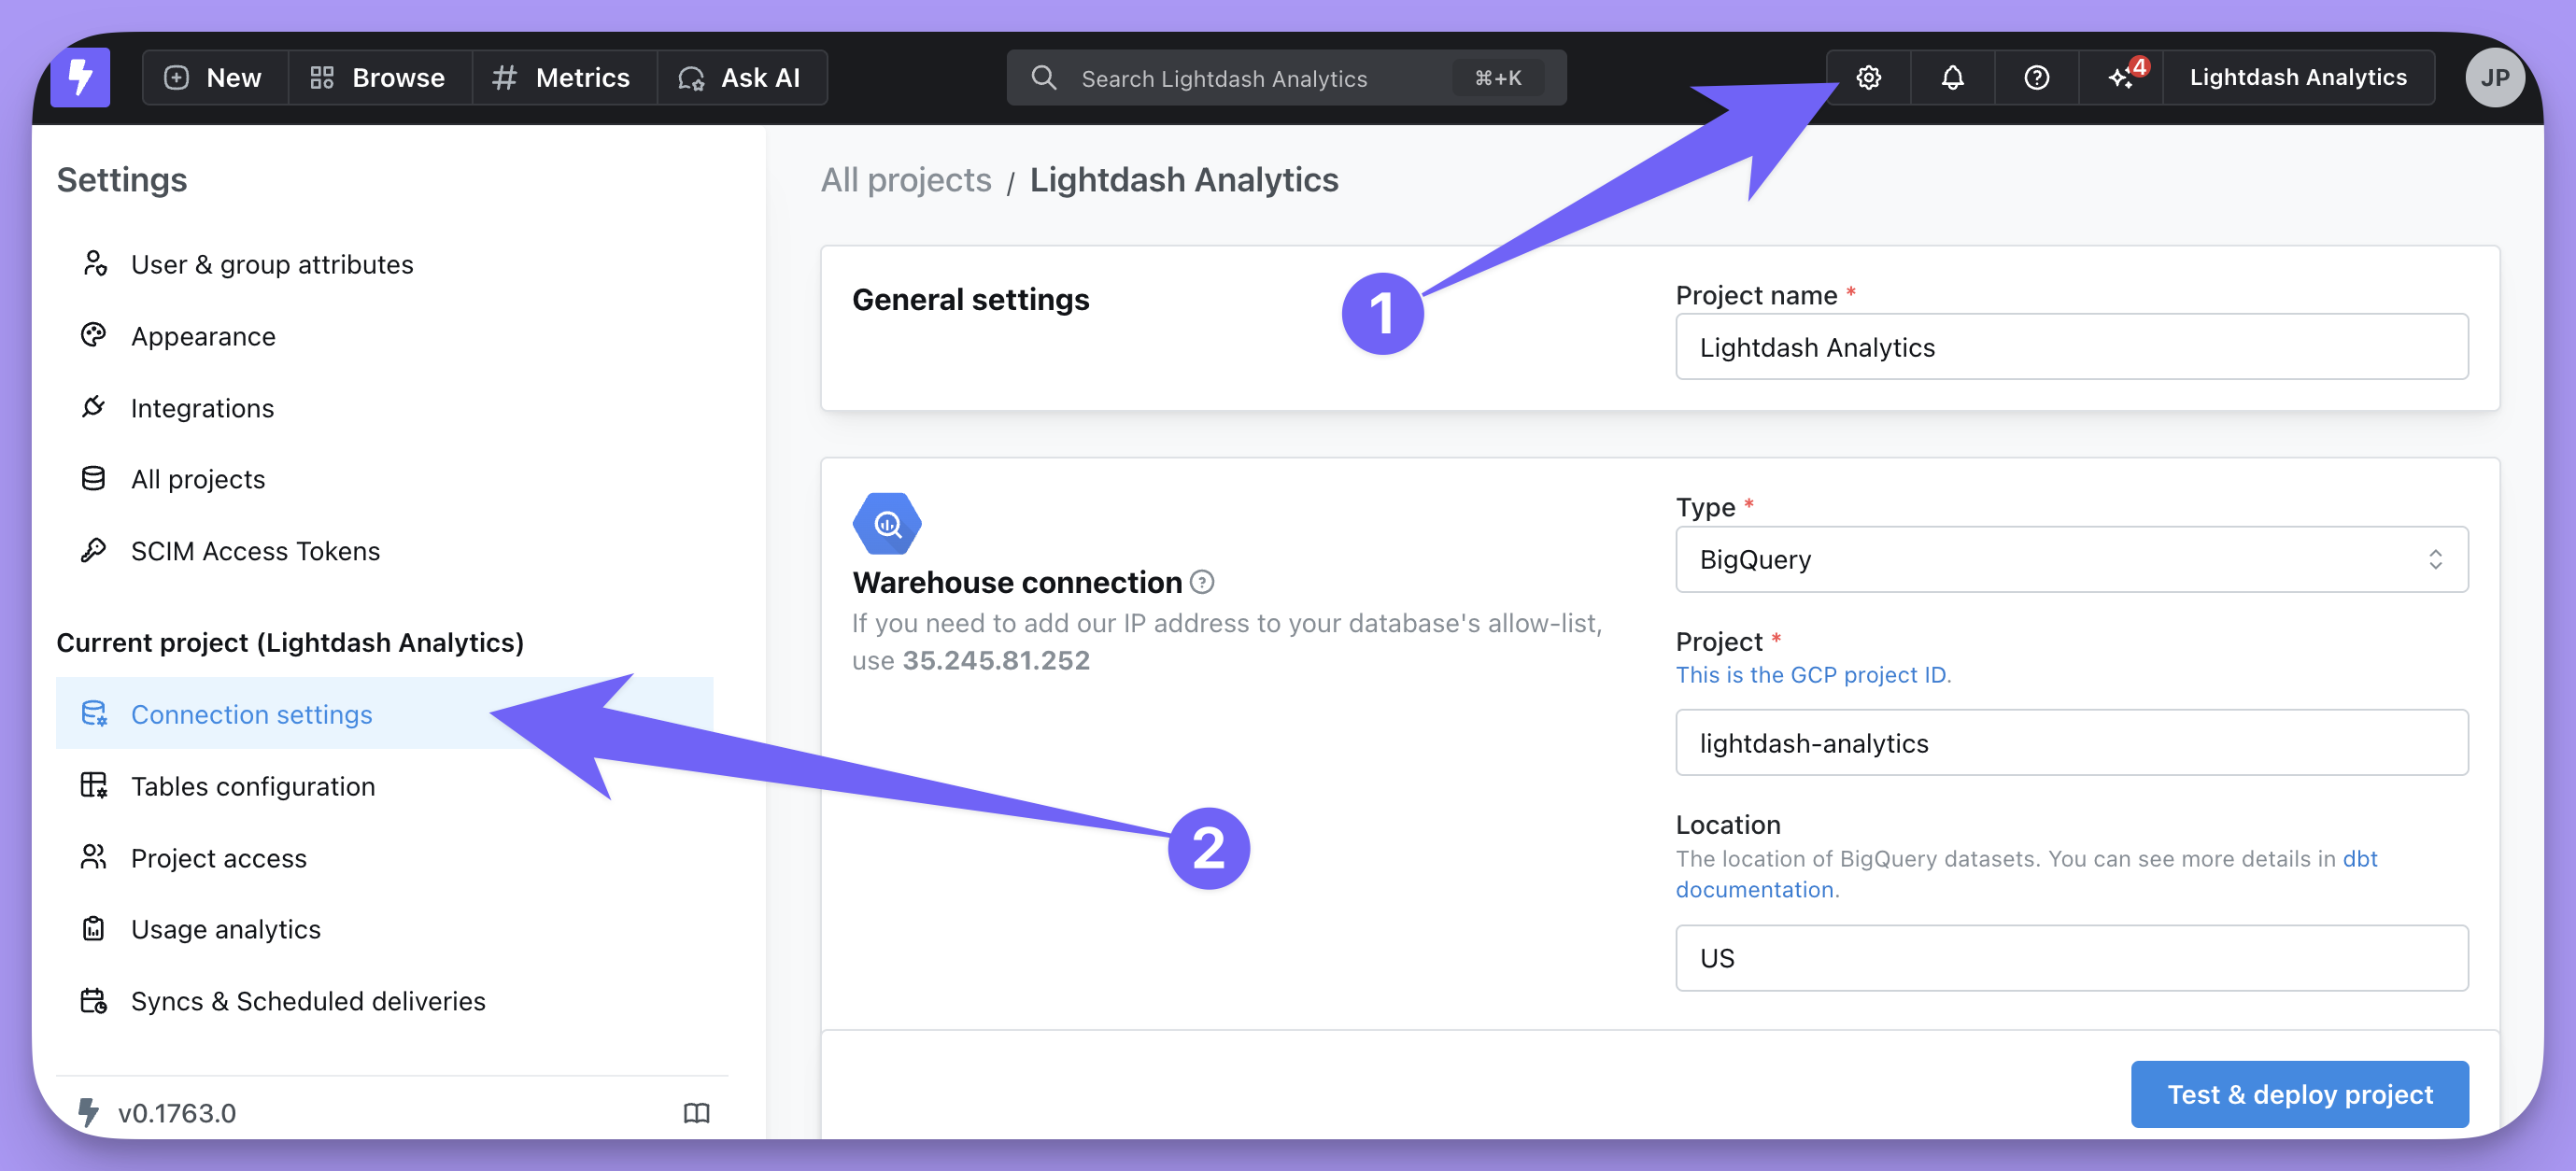
To update an existing connection, go to Project settings by clicking on the gear icon in the top-right navigation.
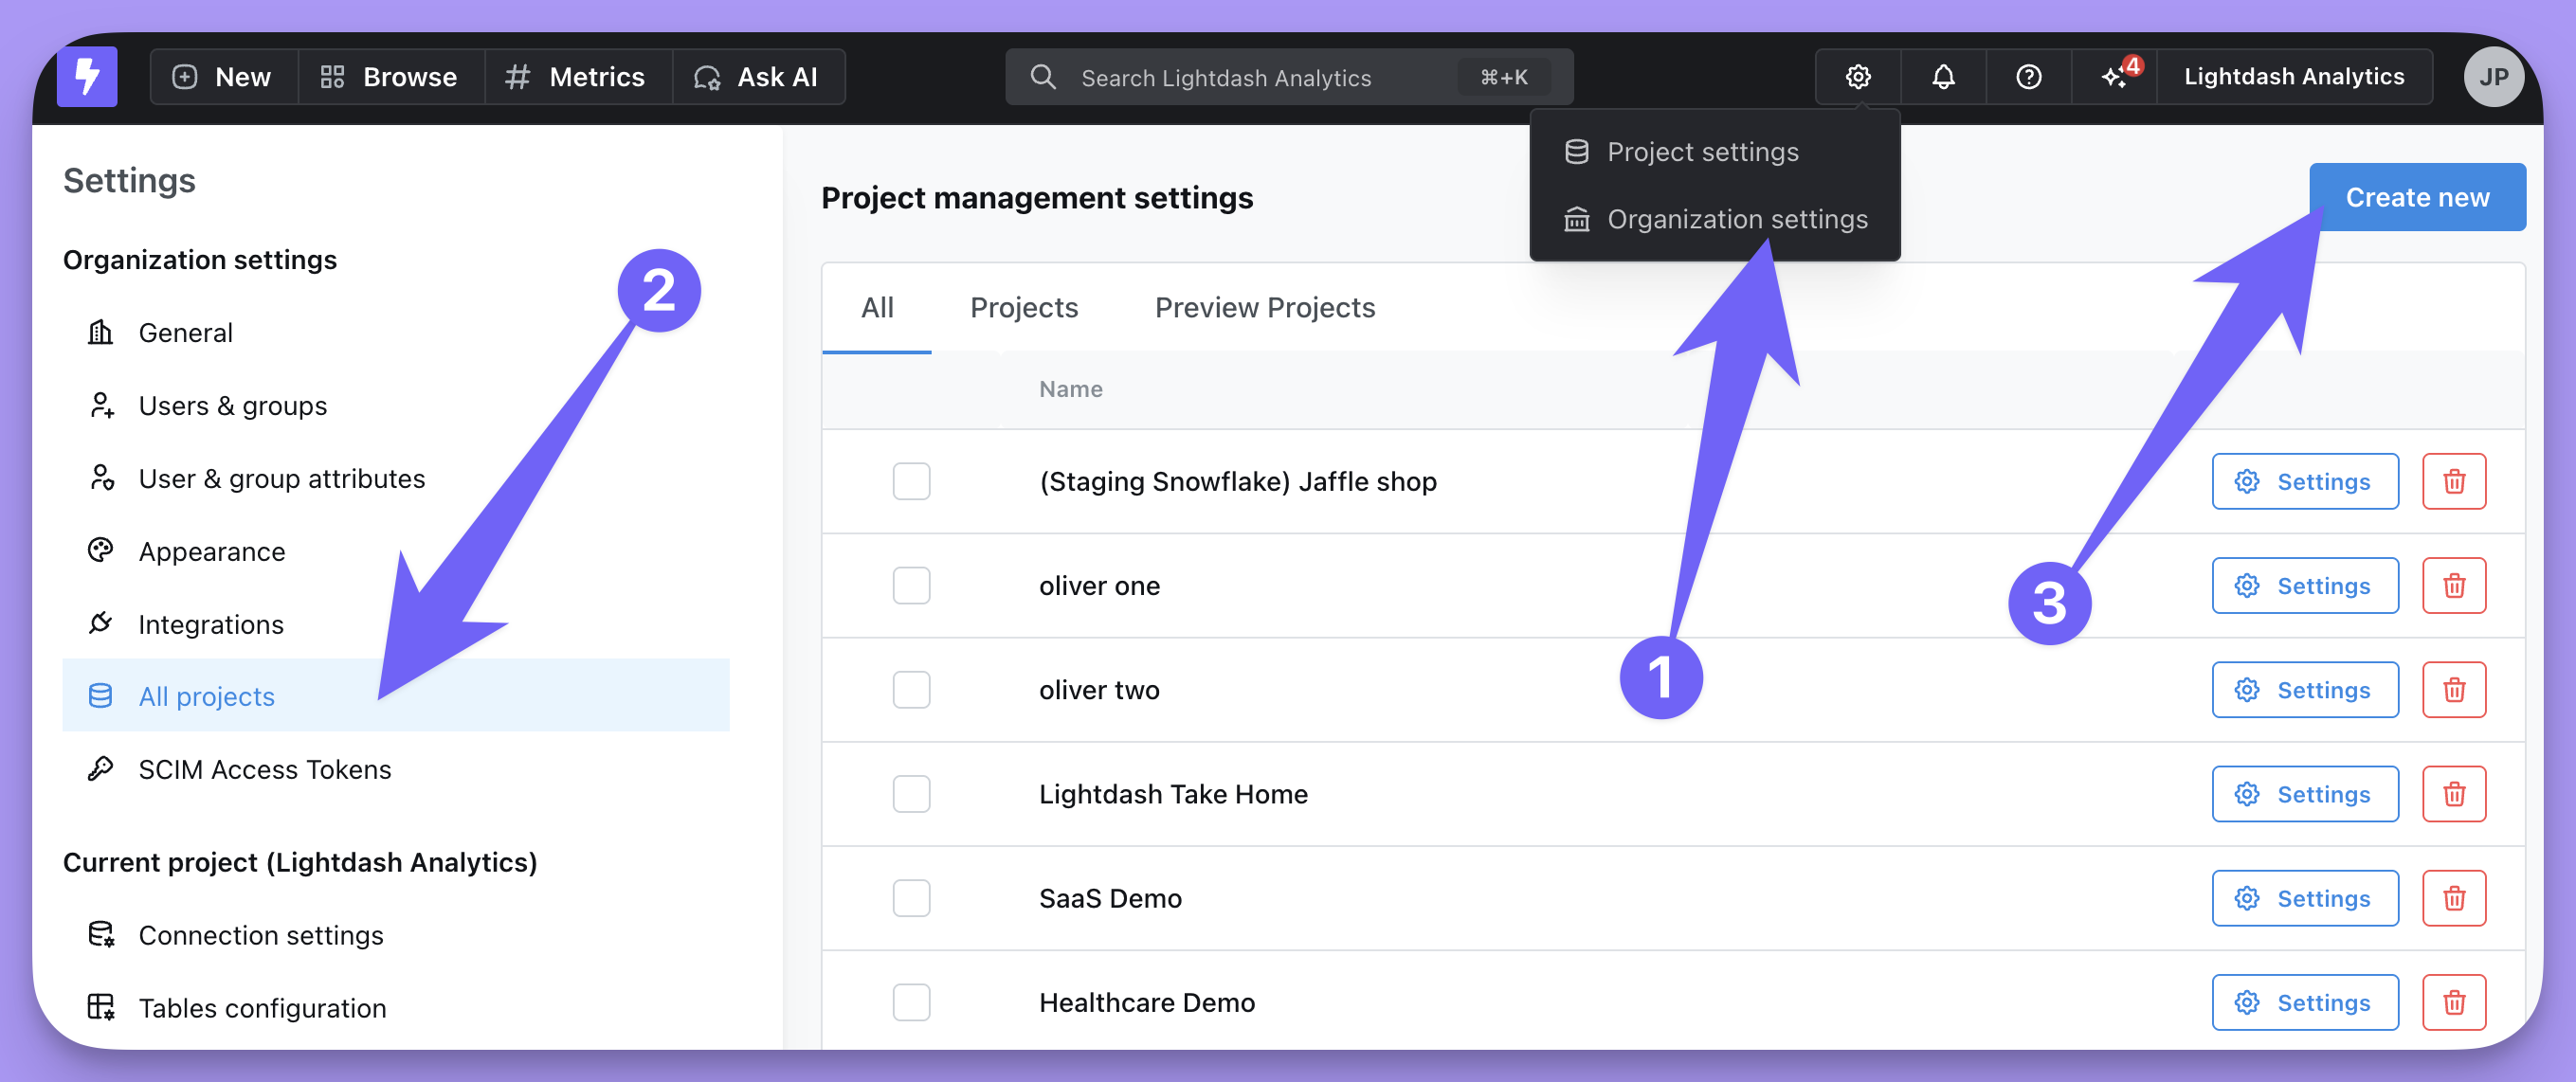
To create a new project, go to Organization settings, then All projects and click Create new.
1. Connect to a warehouse
We currently support BigQuery, Postgres, Supabase, Redshift, Snowflake, Databricks, Trino, ClickHouse, DuckDB, and Athena.
We always recommend giving read-only permissions to Qyra, that way you ensure than no data can be manipulated. See each section below for warehouse specific details.
Bigquery
Project
This is project ID from Google Cloud Platform for the data that you want to connect Qyra to.
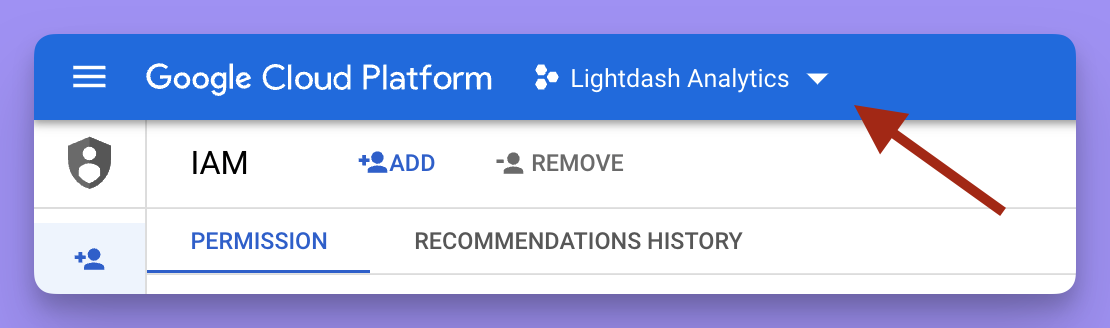
To find your project ID, head to the BigQuery Cloud console.
Once you're in there, click on the project name in the top bar.
Then, you should see all of the projects and their project IDs in your organization (that you have access to).
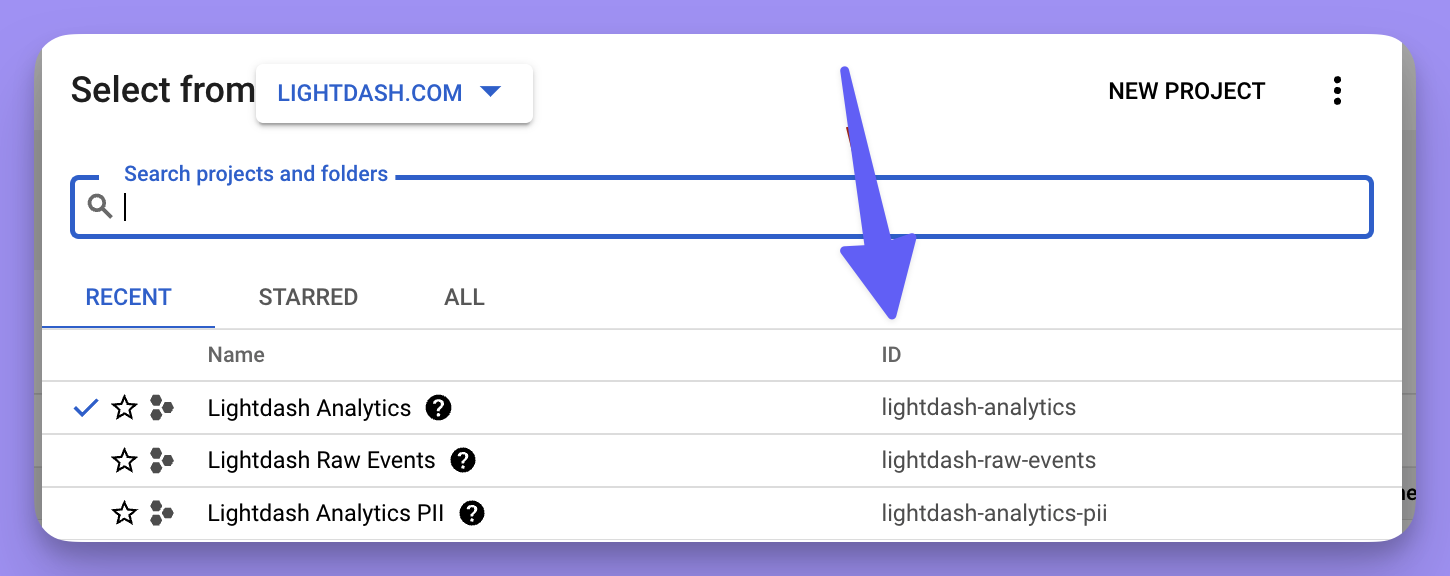
For the project you want to connect Qyra to, just copy its id and pop it into the project field in the Warehouse Connection form in Qyra.
Authentication type
You can choose to connect to BigQuery with a user account (using "Sign in with Google") or with a service account using a JSON key file.
User Account (Sign in with Google)
When you use "Sign in with Google" - Qyra will execute queries against bigquery with your personal google user account. This is the simplest way to get connected quickly using your existing account.
When the new-onboarding feature flag is enabled, new BigQuery projects default to Sign in with Google and the setup wizard suggests smart defaults after you authenticate: a recommended Project ID based on your Google account's BigQuery activity, and the largest available Dataset (marked with a Recommended · largest badge in the picker). You can override either at any time.
Service account (JSON Key File)
To have Qyra connect to BigQuery with a service account, you need to create the account and JSON key. You can read more about creating and managing service accounts with Google BigQuery in their docs. You will need permissions to create service accounts and keys in your Google Project. If you don't have the permissions, use your user account instead.
If you're creating a new service account, make sure that you save your JSON key file somewhere safe! You'll need it for connecting to Qyra.
The service account you use with Qyra will need to have the following roles in your GCP project:
-
roles/bigquery.dataViewer(to see data in your project) -
roles/bigquery.jobUser(to run queries in your project)
If you need to provide access to data across multiple BigQuery projects, the service account will need to be granted roles/bigquery.dataViewer on each additional BigQuery project.
Once you have a service account all ready to go, you'll need to add its JSON key file to Qyra in the key file section of the Warehouse Connection page.
Location
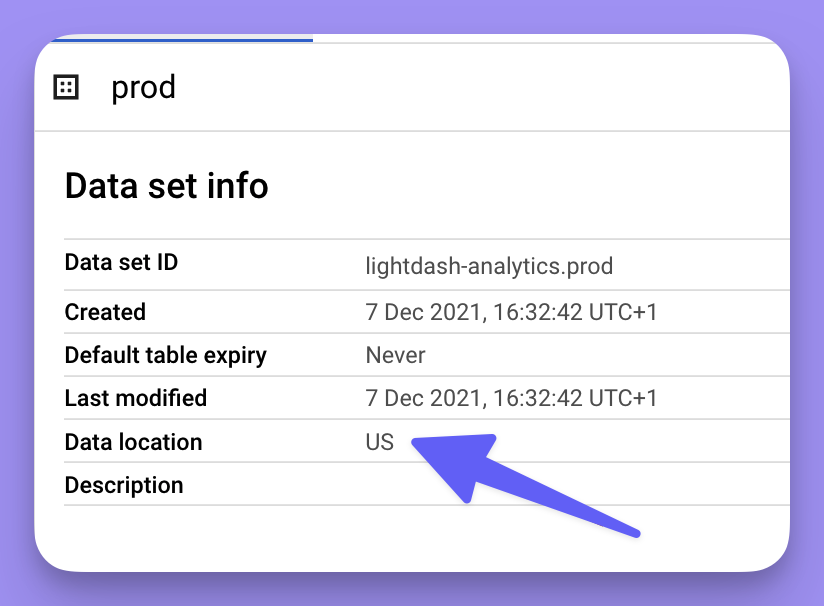
The data location of the dataset in BigQuery where the output of your dbt models is written to.
location may be either a multi-regional location (e.g. EU, US), or a regional location (e.g. us-west2 ). Check out the BigQuery documentation for more information on dataset locations.
You can find the location of the dataset you're using for your dbt project in your dbt profiles.yml file, or in your BigQuery console.
Timeout in seconds
BigQuery supports query timeouts. By default, the timeout is set to 300 seconds. If a query run by Qyra takes longer than this timeout to complete, then BigQuery may cancel the query and issue the following error:
Operation did not complete within the designated timeout.To change this timeout, use the Timeout in seconds configuration.
Priority
The priority for the BigQuery jobs that Qyra executes can be configured with the priority configuration in your Warehouse Connection settings. The priority field can be set to one of batch or interactive.
For more information on query priority, check out the BigQuery documentation.
Retries
The retries configuration specifies the number of times Qyra should retry queries that result in unhandled server errors.
For example, setting retries to 5 means that Qyra will retry BigQuery queries 5 times with a delay. If the query does not succeed after the fifth attempt, then Qyra will raise an error.
By default, the number of retries is set to 3.
Maximum bytes billed
If a value for the Maximum bytes billed is set, then queries executed by Qyra will fail if they exceed the configured maximum bytes threshhold. This configuration should be supplied as an integer number of bytes.
For example, setting this to 1000000000 means if a query would bill more than a gigabyte of data (e.g. 2Gb), then BigQuery will reject the query and you'd get an error like this:
Query exceeded limit for bytes billed: 1000000000. 2000000000 or higher required.Start of week
This controls what day is the start of the week in Qyra. Auto sets it to whatever the default is for your data warehouse. Or, you can customize it and select the day of the week from the drop-down menu. This will be taken into account when using 'WEEK' time interval in Qyra.
Execution project
Here you can specify an execution project to bill for query execution, instead of using the project where your dbt resources are materialized. If you leave this blank, all costs get applied to the project from the top of the connection details.
Postgres
You can see more details in dbt documentation.
Using Supabase? Supabase runs on Postgres, so pick Postgres as your warehouse and use your Supabase connection details. See the Supabase setup guide below for step-by-step instructions, including a quickstart repo that wires up the CLI and AI-generated models for you.
Host
This is the host where the database is running.
User
This is the database user name.
Password
This is the database user password.
DB name
This is the database name.
Schema
This is the default schema used by dbt to compile and run your dbt project. You can find this in the dbt cloud IDE or your local profiles.yml file.
If you're a dbt cloud user you can find this under your profile in the dbt cloud IDE:
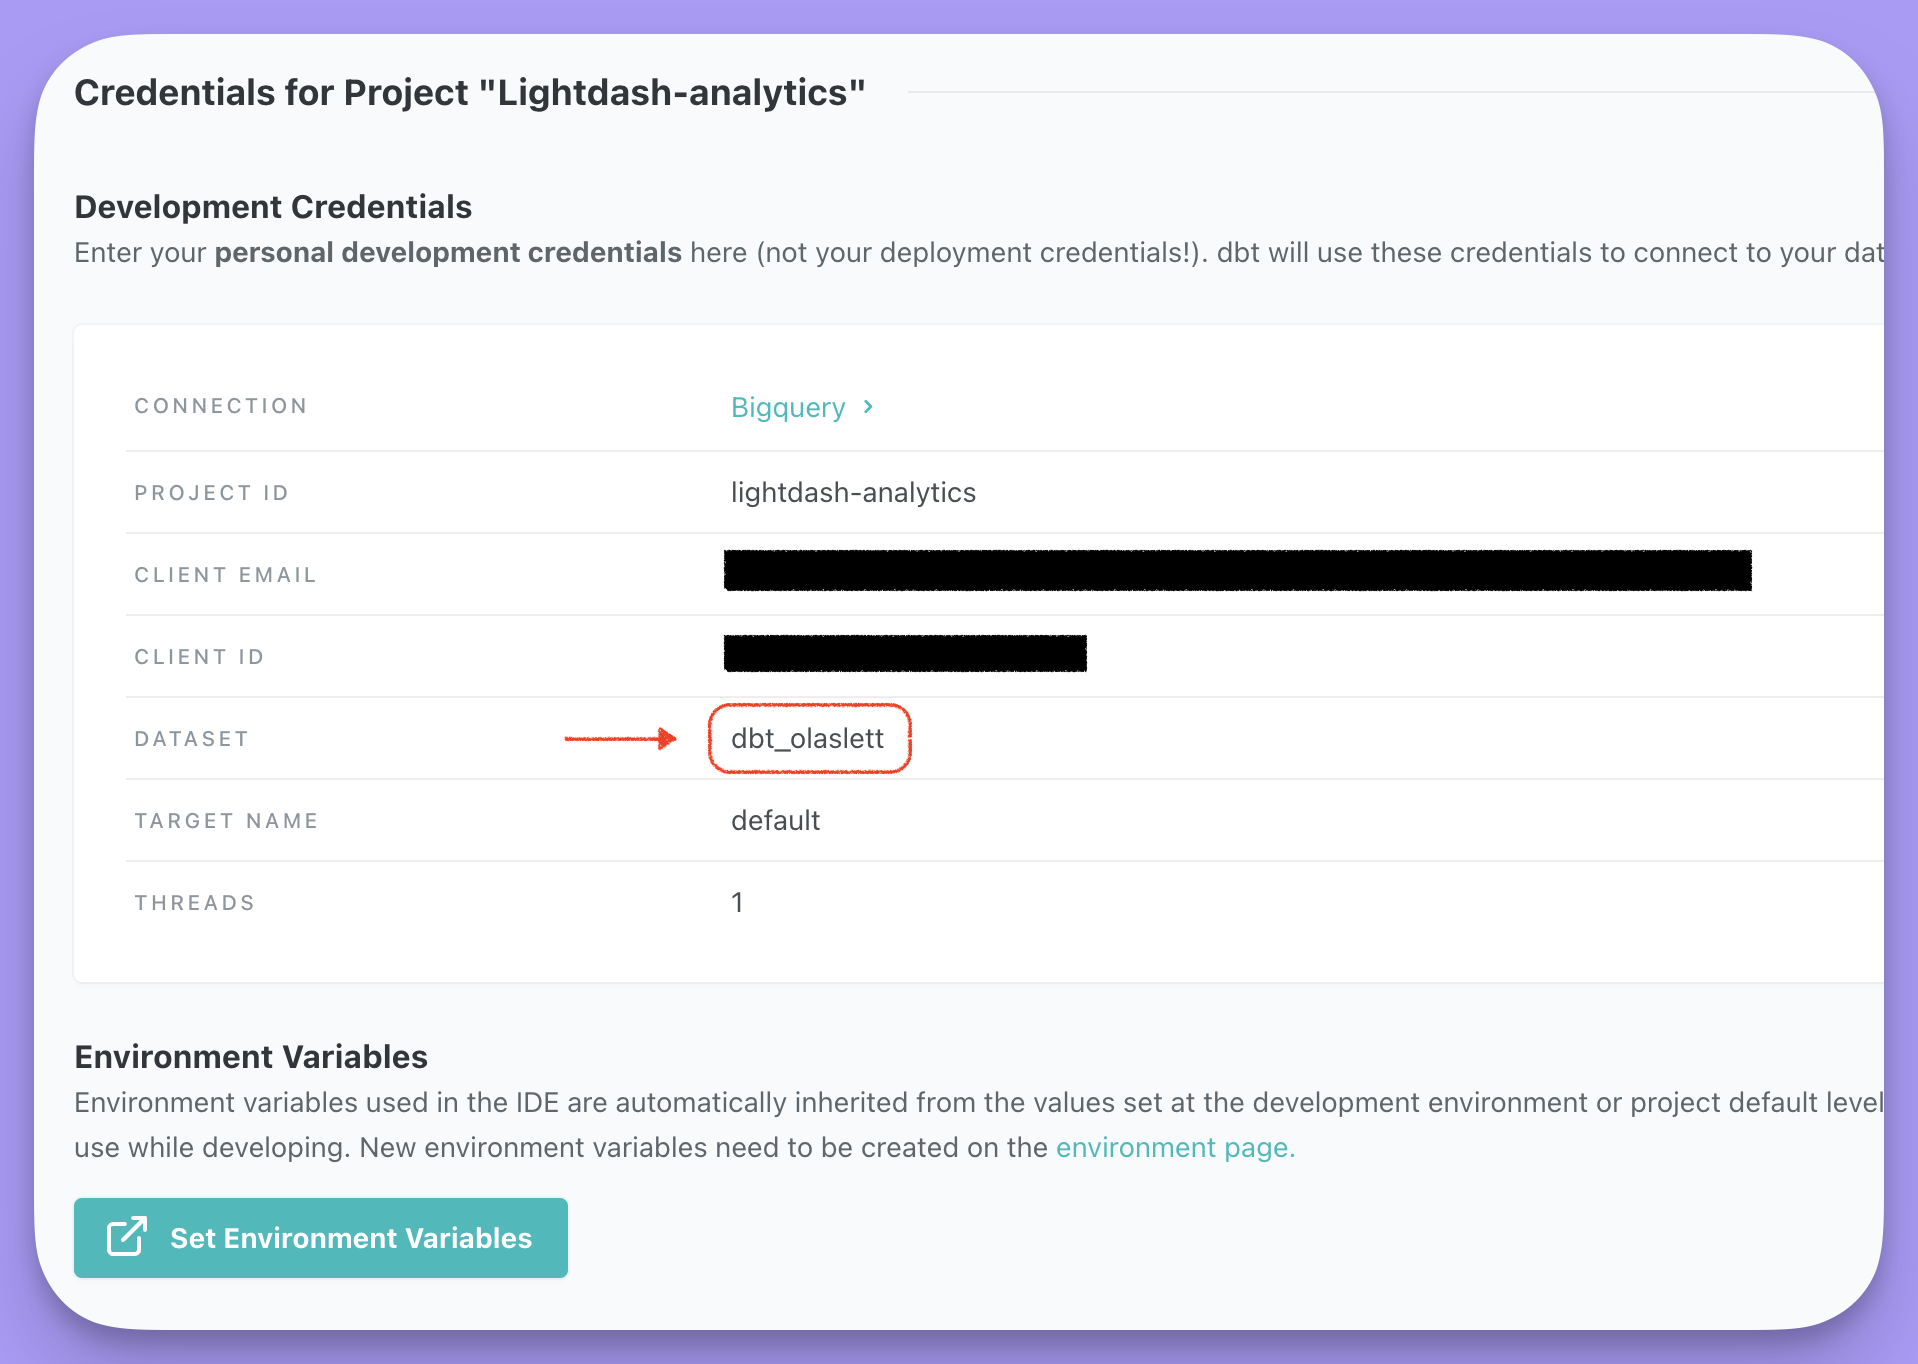
If you work with dbt locally, then check your profiles.yml file at ~/.dbt/profiles.yml and look for a field named schema:
company-name:
  target: dev
  outputs:
    dev:
      type: postgres
      host: [hostname]
      user: [username]
      password: [password]
      port: [port]
      dbname: [database name]
schema: [dbt schema] # look for this one!Port
This is the port where the database is running.
Keep alive idle (seconds)
This specifies the amount of seconds with no network activity after which the operating system should send a TCP keepalive message to the client. You can see more details in postgresqlco documentation.
Search path
This controls the Postgres "search path". You can see more details in dbt documentation.
SSL mode
This controls how dbt connects to Postgres databases using SSL. You can see more details in dbt documentation.
SSL certificate
The client certificate used to authenticate your connection to the database. This is only required if you're using SSL mode verify-full.
SSL private key
The private key used to authenticate your connection to the database. This is only required if you're using SSL mode verify-full.
SSL root certificate
The trusted certificate authority (CA) certificate used to verify the database server’s identity. This is only required if you're using SSL mode verify-ca or verify-full.
Start of week
This controls what day is the start of the week in Qyra. Auto sets it to whatever the default is for your data warehouse. Or, you can customize it and select the day of the week from the drop-down menu. This will be taken into account when using 'WEEK' time interval in Qyra.
Use SSH tunnel
Enable to input your SSH Remote Host, SSH Remote Port, SSH Username, and to generate a public SSH key. Use this when your Postgres database is in a private VPC and cannot be reached directly from Qyra. See Connect through an SSH tunnel for the full setup.
Supabase
Supabase is a managed Postgres database, so Qyra connects to it using the Postgres warehouse type — there's no separate Supabase connector to pick. The fields below are the same Postgres fields documented above; this section just maps them to the values Supabase exposes.
Prefer a hands-on walkthrough? The qyra/qyra-supabase-quickstart repo gets you from zero to charts on your Supabase data in about 15 minutes, with no dbt project required. It includes setup scripts for macOS/Linux and Windows, a preconfigured Supabase MCP so your AI agent (Cursor or Claude Code) can generate Qyra models from your schema, and a set-warehouse script that wires up your warehouse credentials via the API.
Get your Supabase connection details
In the Supabase dashboard, open your project and go to Connect → Session Pooler → View parameters. Use the Session pooler (not the direct connection or transaction pooler) — it accepts long-running queries and is the right fit for Qyra.
Map the Supabase parameters to the Qyra Postgres connection form:
| Qyra field | Supabase value |
|---|---|
| Host | Pooler host (e.g. aws-0-<region>.pooler.supabase.com) |
| Port | 5432 (session pooler) |
| User | postgres.<your-project-ref> |
| Password | Your database password (set when you created the project; you can reset it under Database → Settings) |
| DB name | postgres |
| Schema | The schema your models live in — typically public |
| SSL mode | require |
If your Qyra instance is hosted by Quanvio (Cloud), it connects from a static IP; self-hosted instances connect from your own network. Supabase accepts traffic from anywhere by default; if you've enabled Network Restrictions under Project Settings → Database, allowlist the appropriate IP.
Setup options
The Supabase quickstart repo automates everything below — clone it and follow the README.
-
Clone the repo and install the Qyra CLI:
git clone git@github.com:quanvio/qyra-supabase-quickstart.git cd qyra-supabase-quickstart npm install -g qyra-cli qyra login <your-qyra-instance-url> --token <your-token> -
Install Qyra skills for your AI agent — this loads the Qyra YAML reference into your editor session so the agent can generate and validate models correctly:
# Claude Code (default) qyra install-skills # Cursor qyra install-skills --agent cursor # Codex qyra install-skills --agent codex -
Connect the Supabase MCP — the repo ships with
.cursor/mcp.jsonand.claude/mcp.jsonalready configured. SetSUPABASE_ACCESS_TOKENin your environment, open the project in Cursor or Claude Code, and verify thesupabaseMCP shows a green status in your editor's MCP settings. -
Connect your database — run the setup script and paste in your Supabase pooler credentials when prompted:
# macOS / Linux bash setup.sh # Windows: copy .env.example to .env and fill in the pooler values -
Generate models from your schema — in Cursor or Claude Code, ask the agent:
Look at my Supabase tables and generate Qyra models
The agent reads your schema through the Supabase MCP and writes YAML files into
models/with sensible metrics and dimensions wired up. -
Deploy your project:
dbt run
qyra lint
qyra deploy --create "Supabase demo"
After any model changes, run qyra lint && qyra deploy. The repo also ships a GitHub Action (.github/workflows/qyra-validate.yml) that validates Qyra config files on every push.
Troubleshooting
| Problem | Fix |
|---|---|
password authentication failed for user "postgres" | Make sure the user is postgres.<your-project-ref> (with the project ref suffix) when using the session pooler, not just postgres. |
| Connection times out | Confirm you're using the session pooler host and port 5432, not the direct database host. If you've enabled Network Restrictions in Supabase, add the Qyra static IP for your region. |
SSL connection required | Set SSL mode to require. |
| MCP keeps disconnecting (quickstart repo) | Restart your editor. On Windows, also check that your firewall isn't blocking outbound HTTPS. |
Redshift
You can see more details in dbt documentation.
Host
This is the host where the database is running.
User
This is the database user name.
Password
This is the database user password.
DB name
This is the database name.
Schema
This is the default schema used by dbt to compile and run your dbt project. You can find this in the dbt cloud IDE or your local profiles.yml file.
If you're a dbt cloud user you can find this under your profile in the dbt cloud IDE:
If you work with dbt locally, then check your profiles.yml file at ~/.dbt/profiles.yml and look for a field named schema:
company-name:
  target: dev
  outputs:
    dev:
      type: redshift
      host: hostname.region.redshift.amazonaws.com
      user: username
      password: password1
      port: 5439
      dbname: analytics
schema: analytics # look for this one!Port
This is the port where the database is running.
Keep alive idle (seconds)
This specifies the amount of seconds with no network activity after which the operating system should send a TCP keepalive message to the client.
If the database closes its connection while Qyra is waiting for data, you may see the error SSL SYSCALL error: EOF detected. Lowering the keepalives_idle value may prevent this, because the server will send a ping to keep the connection active more frequently.
By default, this value is set to 240 seconds, but can be configured lower (perhaps 120 or 60), at the cost of a chattier network connection.
SSL mode
This controls how dbt connects to Postgres databases using SSL.
RA3 Node
Allow dbt to use cross-database-resources
Start of week
This controls what day is the start of the week in Qyra. Auto sets it to whatever the default is for your data warehouse. Or, you can customize it and select the day of the week from the drop-down menu. This will be taken into account when using 'WEEK' time interval in Qyra.
Use SSH tunnel
Enable to input your SSH Remote Host, SSH Remote Port, SSH Username, and to generate a public SSH key. Use this when your Redshift cluster is in a private VPC and cannot be reached directly from Qyra. See Connect through an SSH tunnel for the full setup.
Authentication type
By default Qyra connects to Redshift with a database username and password. You can instead authenticate with AWS IAM: Qyra mints short-lived Redshift database credentials from AWS at connection time, then connects over the standard Postgres protocol. No long-lived database password is stored. This is useful when your security policy disallows static or hashed passwords, or when your cluster fronts Lake Formation.
Qyra supports three Redshift authentication methods:
- Username & password: store a shared Redshift database user and password on the project connection.
- AWS IAM (CLI credentials): users paste temporary AWS credentials, or admins configure an IAM role/access-key identity, and Qyra uses those AWS credentials to mint temporary Redshift database credentials.
- User Account (Sign in with AWS): users sign in through AWS IAM Identity Center in the browser. The project stores the AWS access portal and account/role metadata; each user signs in with AWS and Qyra stores short-lived per-user AWS credentials.
When Authentication type is set to AWS IAM (CLI credentials) or User Account (Sign in with AWS), the following fields replace the password. Your Host, DB name, Schema, SSL, and SSH tunnel settings still apply.
AWS region
The AWS region where your Redshift cluster or serverless workgroup is located, for example us-east-1.
Redshift Serverless
Enable if you're connecting to a Redshift Serverless workgroup rather than a provisioned cluster.
Cluster identifier
(Provisioned clusters) The identifier of your Redshift cluster.
Workgroup name
(Serverless) The name of your Redshift Serverless workgroup.
Database user
(Provisioned clusters) The Redshift database user to request temporary credentials for. Serverless derives the user automatically.
When using User Account (Sign in with AWS), users can optionally set their own database user when they sign in. If they leave it blank, Redshift derives the user from their IAM Identity Center role.
Assume role ARN
Optional. An IAM role to assume — within your own AWS account — before minting credentials, instead of using the access-key identity directly. Self-hosted instances running on AWS can leave this and the access keys blank to use the host's IAM role.
Assume role external ID
The external ID required by the role's trust policy, if you configured one.
Advanced: AWS access key ID & secret access key
The access key for the IAM user Qyra uses to mint temporary Redshift credentials. On Qyra Cloud, this is how you provide the AWS identity.
Advanced: Auto-create database user
(Provisioned clusters) Create the database user automatically if it does not already exist.
AWS access portal URL
Required for User Account (Sign in with AWS). The IAM Identity Center access portal URL users open to sign in, for example https://d-xxxxxxxxxx.awsapps.com/start.
IAM Identity Center region
Required for User Account (Sign in with AWS). The AWS region where IAM Identity Center is enabled.
AWS account ID
Required for User Account (Sign in with AWS). The AWS account users should access through IAM Identity Center.
AWS role name
Required for User Account (Sign in with AWS). The IAM Identity Center permission set role name users select when signing in. This is usually the permission set name shown in the AWS access portal, for example QyraRedshiftReadOnly.
Snowflake
You can see more details in dbt documentation.
Account
This is your Snowflake account identifer.
The easiest way to find this is to login to Snowflake in your browser. Your account identifier is found in the URL in the format <organization_id>-<account_id>.
For example, if your Snowflake URL looks like https://app.snowflake.com/ehcrzll/aaa99827/#/homepage, your account identifier would be ehcrzll-aaa99827 (combining both IDs with a hyphen).

Important: The account identifier requires both the organization ID and account ID separated by a hyphen, not just the account name alone.
You can also find your account identifier by using the format <organization_name>-<account_name> where organization_name and account_name can be found by following any of the methods listed in Managing accounts in your organization.
User
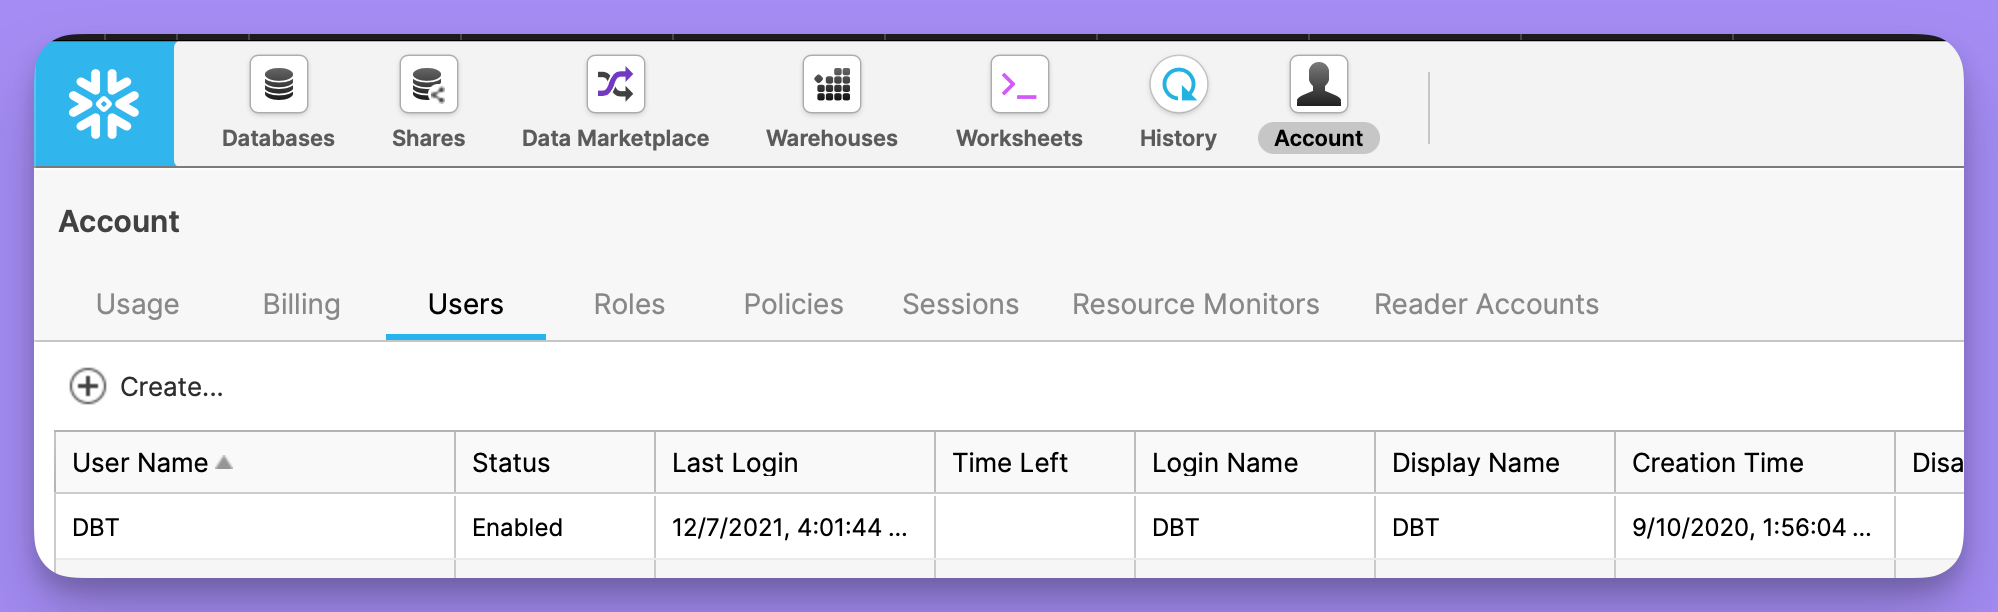
This is the login name for your Snowflake user. This is usually the same username you use to login to Snowflake.
Alternatively, you can create a new user through the snowflake consolewith a username and password specifically for Qyra to use.
If you're a snowflake admin you can list all users available in the snowflake console:
Authentication type
Choose to authenticate using either a user account (using "Sign in with Snowflake" or "Connect via Qyra CLI (SSO)") or with a service account using a JSON key file or password.
Connect via Qyra CLI (SSO)
This method is available behind the new-onboarding feature flag and only applies during project creation. Contact Qyra support to enable it for your workspace.
Use this when your Snowflake account requires SSO (or MFA) and you don't want to paste a password, private key, or PAT to create the project. The Qyra CLI signs you in to Snowflake in your browser and provisions a durable credential that is deposited straight into the project connection form — you never handle the secret yourself.
How it works:
-
In the Snowflake connection form, choose Connect via Qyra CLI (SSO). Qyra generates a single-use connect code (valid for 15 minutes) and shows the CLI command to run.
-
Run the command shown in the setup wizard from a machine that has the Qyra CLI installed:
qyra connect-snowflake \ --url https://app.qyraflow.com \ --code <one-time-code> \ --account ecomstore-xy12345 -
The CLI opens your Snowflake SSO login in a browser. Once you sign in, the CLI mints a durable Snowflake credential and deposits it into the setup wizard tab.
-
The wizard shows Connected as
<user>✓ and pre-fills smart defaults from your Snowflake session inventory: the largest database is picked as the default, the recommended compute warehouse is auto-selected, and the first available schema in the chosen database is filled in. Adjust any of these from the dropdowns, then submit the form to create the project.
Credential type the CLI provisions:
The CLI never deposits your raw SSO token. It tries, in order:
- Key-pair authentication (preferred) — generates a local RSA-2048 key-pair and registers the public key in the first free slot on your Snowflake user with
ALTER USER … SET RSA_PUBLIC_KEY. The key is verified with a diagnostic connection before deposit. - Programmatic Access Token (PAT) — if key-pair provisioning fails (for example, because both
RSA_PUBLIC_KEYslots are already in use), the CLI falls back to a Snowflake Programmatic Access Token valid for 365 days.
If both fail, the CLI prints admin remediation SQL and exits without depositing a credential.
Optional flags:
You can preset any of --user, --database, --warehouse, --role, or --schema. Anything not provided is filled from your Snowflake session defaults, or picked in the browser tab from the discovered options.
Security notes:
- The connect code is single-use and expires after 15 minutes; only a SHA-256 hash of it is stored server-side.
- Generating a new connect code invalidates any previous codes for your user.
- A code can only be claimed once, by the user who created it.
- Deposited credentials are encrypted at rest and cleared from the deposit store as soon as the browser tab claims them.
Sign in with Snowflake
This method requires you to configure an Oauth2 flow from your Snowflake warehouse.
You can read more about this on Snowflake official docs
Private Key
You can generate a Private Key for a Snowflake user following the guide here
Once generated, copy across the Private Key File that is generated into Qyra. If you chose to encrypt your private key you will also need to supply the Private Key Passphrase.
Password
This is the password your Snowflake user. This is usually the same password you use to login to Snowflake. Note that due to changes in Snowflake Authentication, users that require passwords may also need to enable MFA, which is not compatible with a Qyra project connection.
Role
This is the security role that you would like to use when running queries as the specified user. The role must have access to any warehouses, databases, schemas, and tables you want to use.
If you're a Snowflake admin you can list all roles available in the snowflake console:
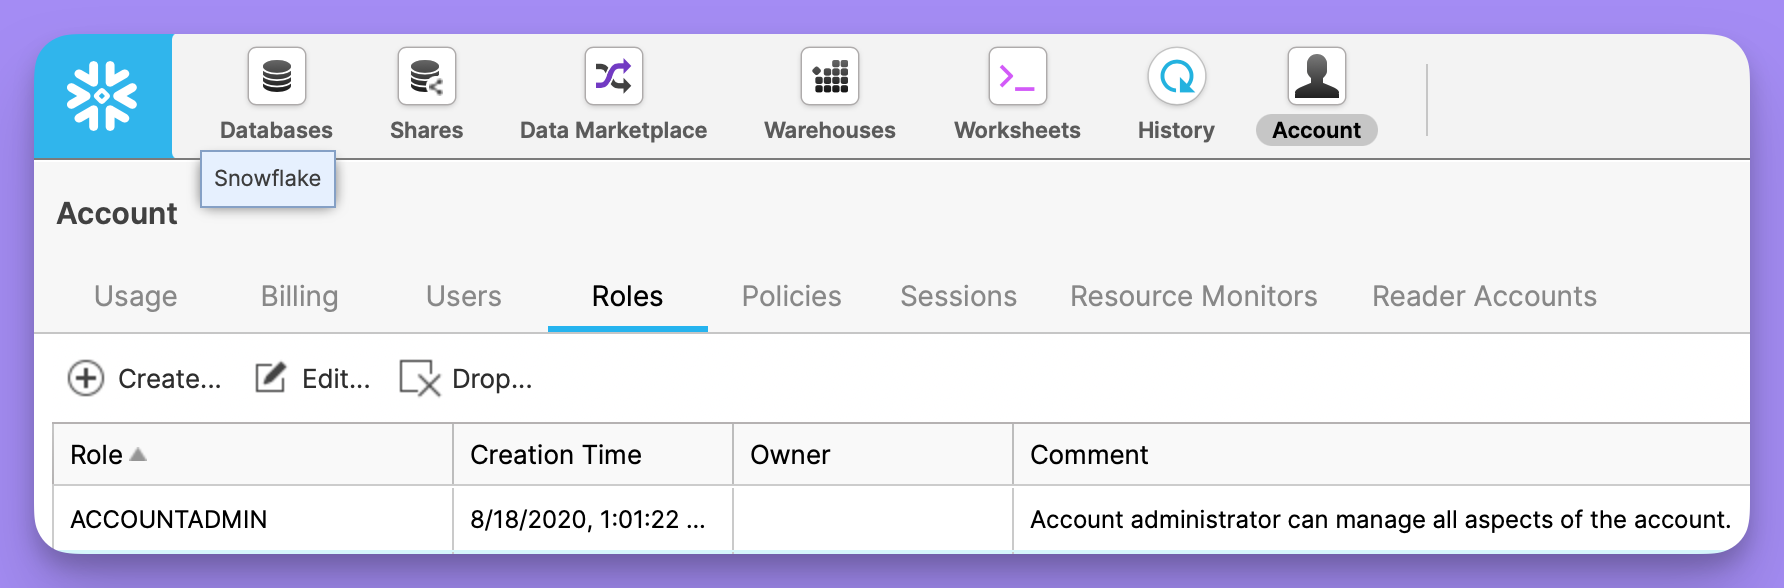
You can configure your role to allow read access to all warehouses, databases, schemas, and tables by following the guide forCreating custom read-only roles.
Database
This is the name of your database. The specified user must be granted access to this database. You can see a list of databases available in the snowflake console:
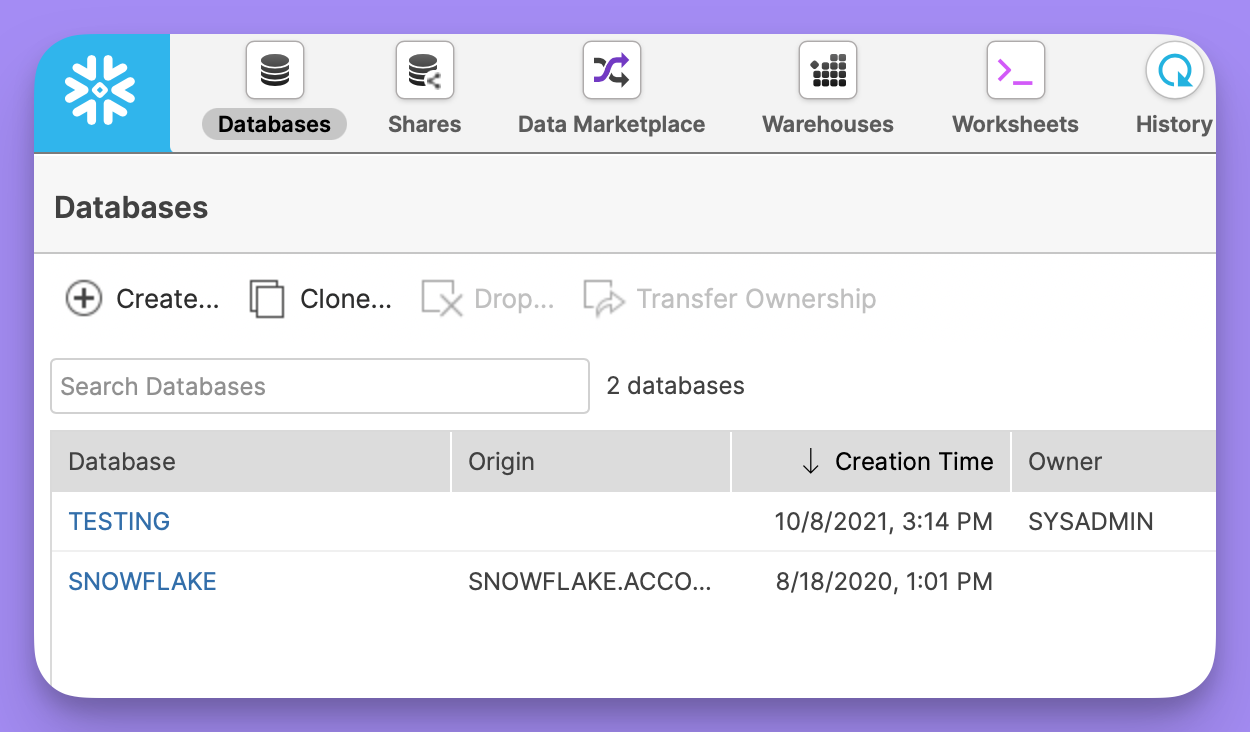
Warehouse
This is the name of the warehouse you would like to use for running queries. The specified user must be grantend access to use this warehouse. You can see al list of warehouses available in the snowflake console:
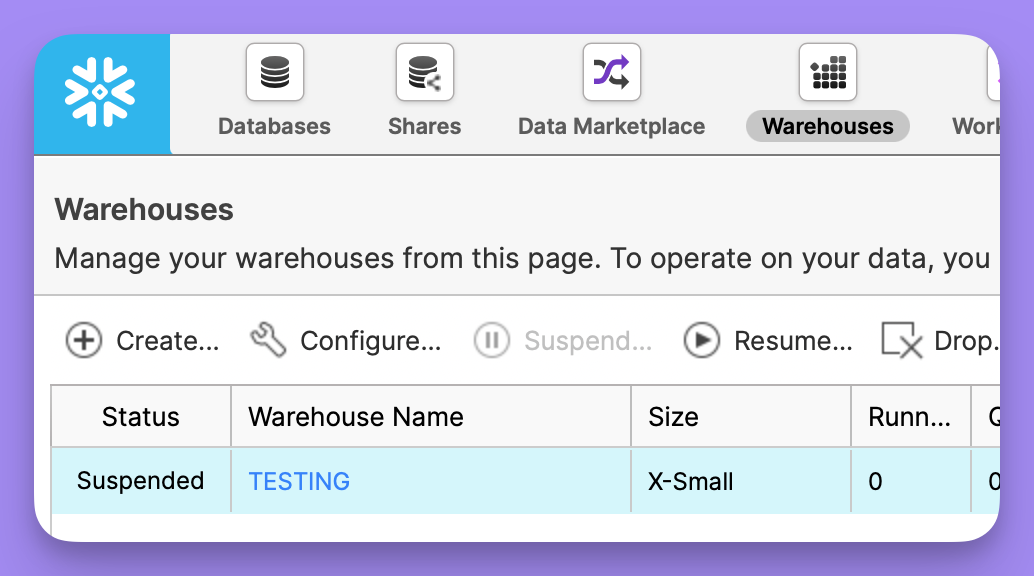
If “Always use this warehouse” is set to yes, this warehouse will be used for all queries, even if the dbt configuration specifies a different warehouse using snowflake_warehouse.
Schema
This is the default schema used by dbt to compile and run your dbt project. You can find this in the dbt cloud IDE or your local profiles.yml file.
If you're a dbt cloud user you can find this under your profile in the dbt cloud IDE:
If you work with dbt locally, then check your profiles.yml file at ~/.dbt/profiles.yml and look for a field named schema:
my-snowflake-db:
  target: dev
  outputs:
    dev:
      type: snowflake
      account: [account id]
      user: [username]
      password: [password]
      role: [user role]
      database: [database name]
      warehouse: [warehouse name]
schema: [dbt schema] # Look for this one!Keep client session alive
This is intended to keep Snowflake sessions alive beyond the typical 4 hour timeout limit. You can see more details in dbt documentation.
Query tag
A value with which to tag all queries, for later searching in QUERY_HISTORY view)
Start of week
This controls what day is the start of the week in Qyra. Auto sets it to whatever the default is for your data warehouse. Or, you can customize it and select the day of the week from the drop-down menu. This will be taken into account when using 'WEEK' time interval in Qyra.
Databricks
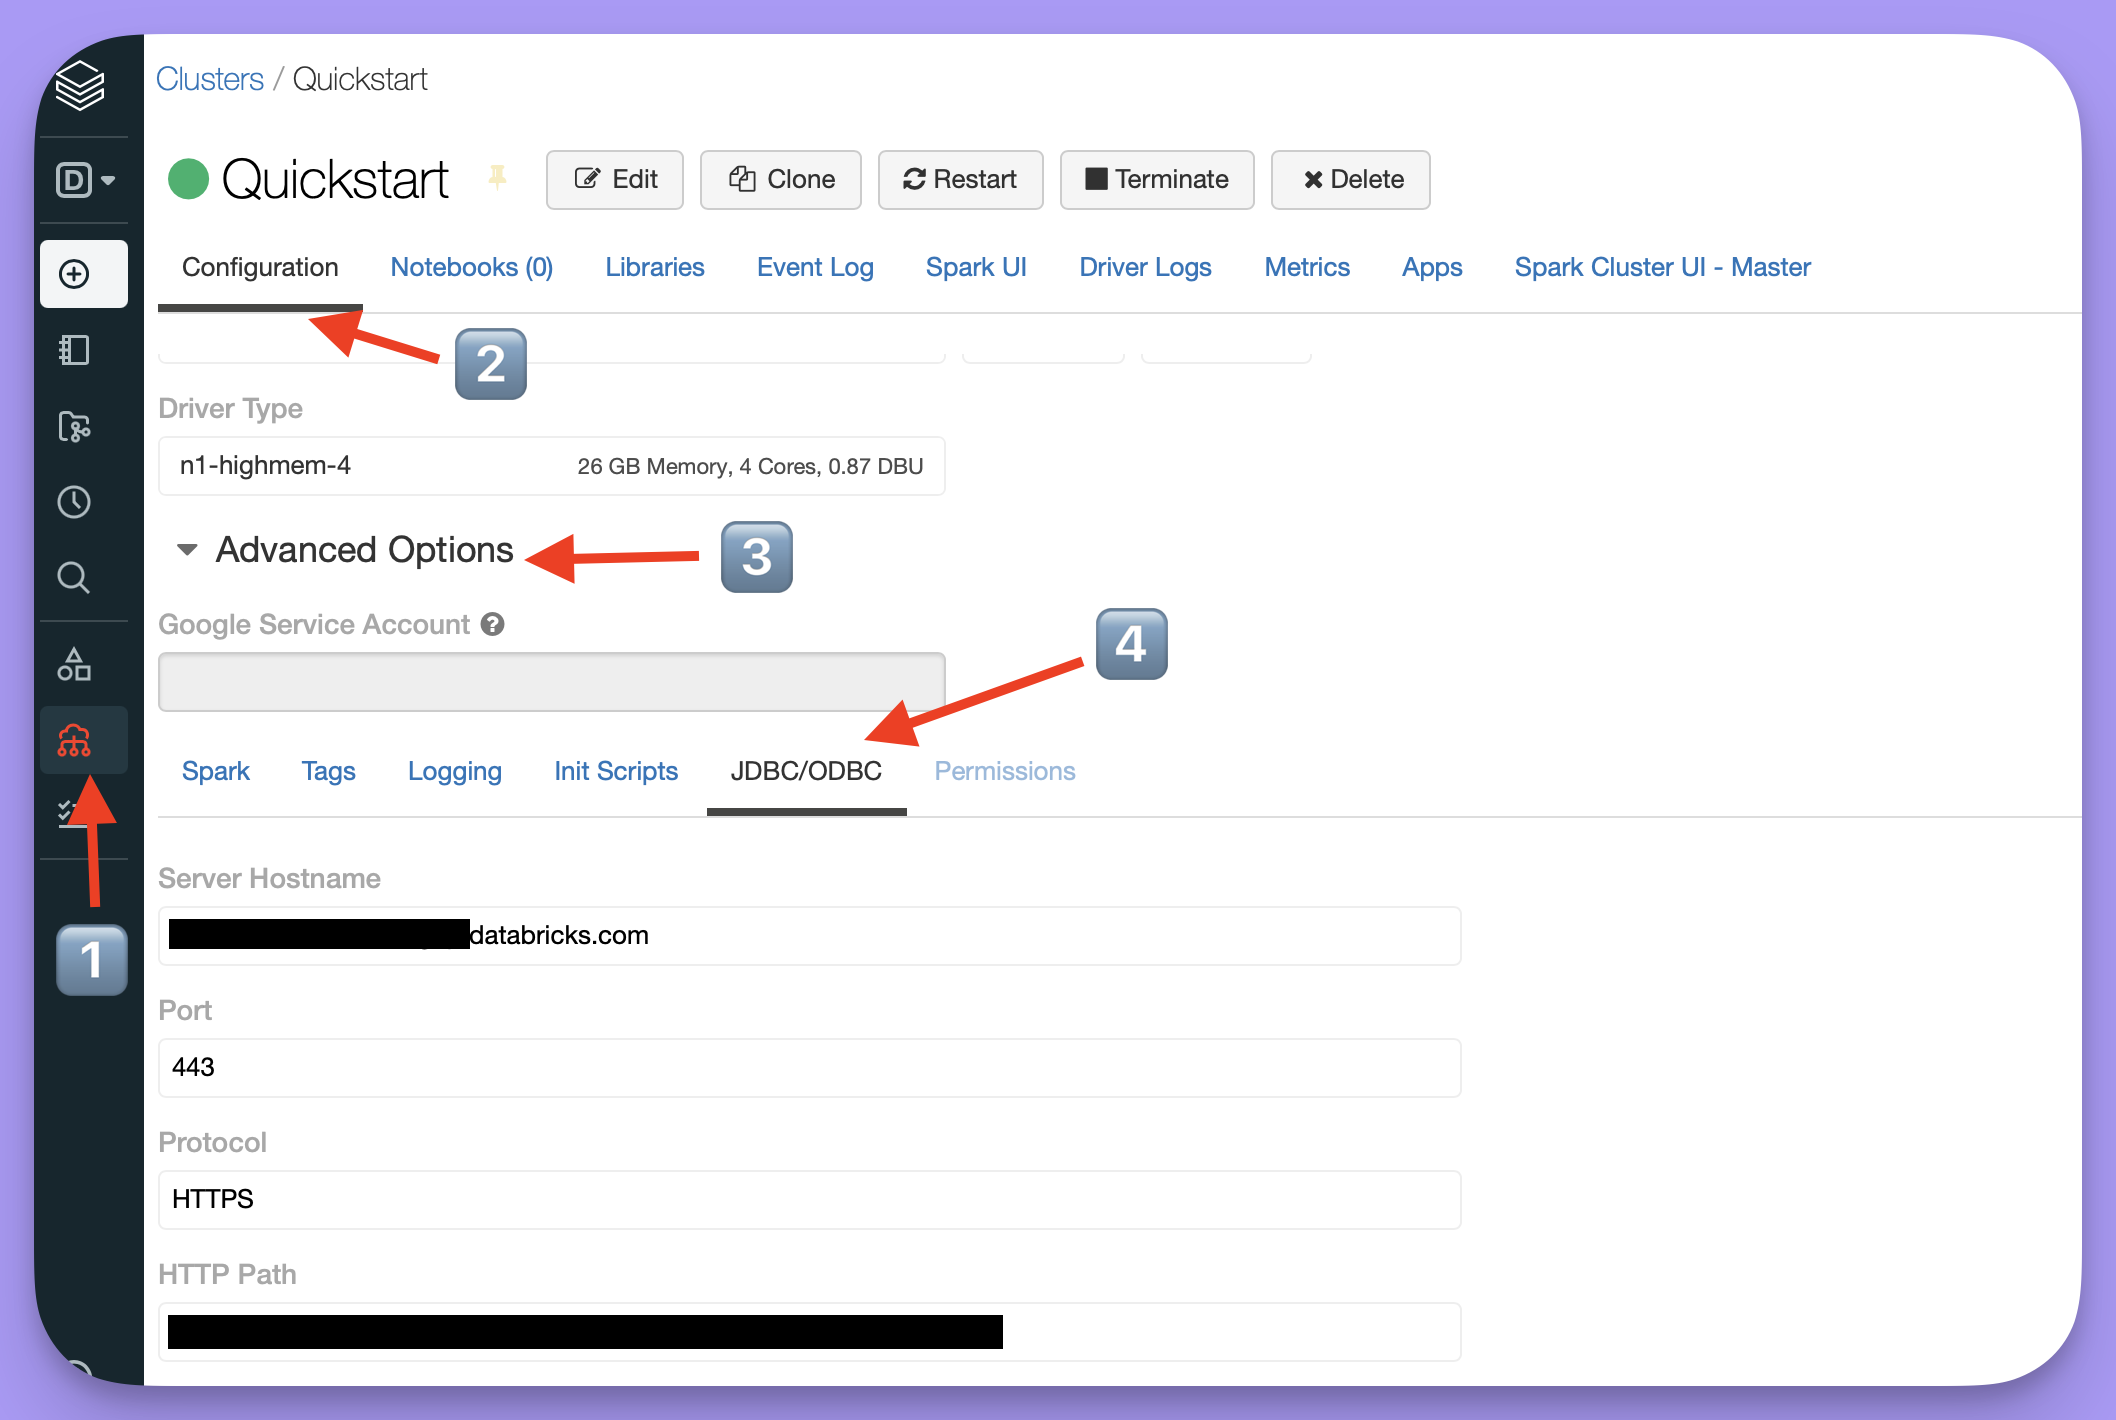
The credentials needed to connect to your cluster can be found in the ODBC options in your databricks account:
-
Go to the
Computetab in the sidebar. -
Click the configuration tab for the cluster that you're connecting to Qyra.
-
Expand the
Advanced optionstab -
Open the
JDBC/ODBCtab
Server hostname
Follow the instructions above to find your ODBC connection instructions.
HTTP Path
Follow the instructions above to find your ODBC connection instructions.
Port
Follow the instructions above to find your ODBC connection instructions.
Authentication type
Choose to authenticate using either a user account (using "Sign in with Databricks") or with a Personal Access Token.
Sign in with Databricks
This method requires you to configure an OAuth application in your Databricks workspace.
Configure the following ENV variables to enable Databricks OAuth:
- DATABRICKS_OAUTH_CLIENT_ID: see above
- DATABRICKS_OAUTH_CLIENT_SECRET (optional): see above
- DATABRICKS_OAUTH_AUTHORIZATION_ENDPOINT: https://your-url.cloud.databricks.com/oidc/v1/authorize
- DATABRICKS_OAUTH_TOKEN_ENDPOINT: https://your-url.cloud.databricks.com/oidc/v1/token
You can read more about this on Databricks official docs.
Personal Access Token
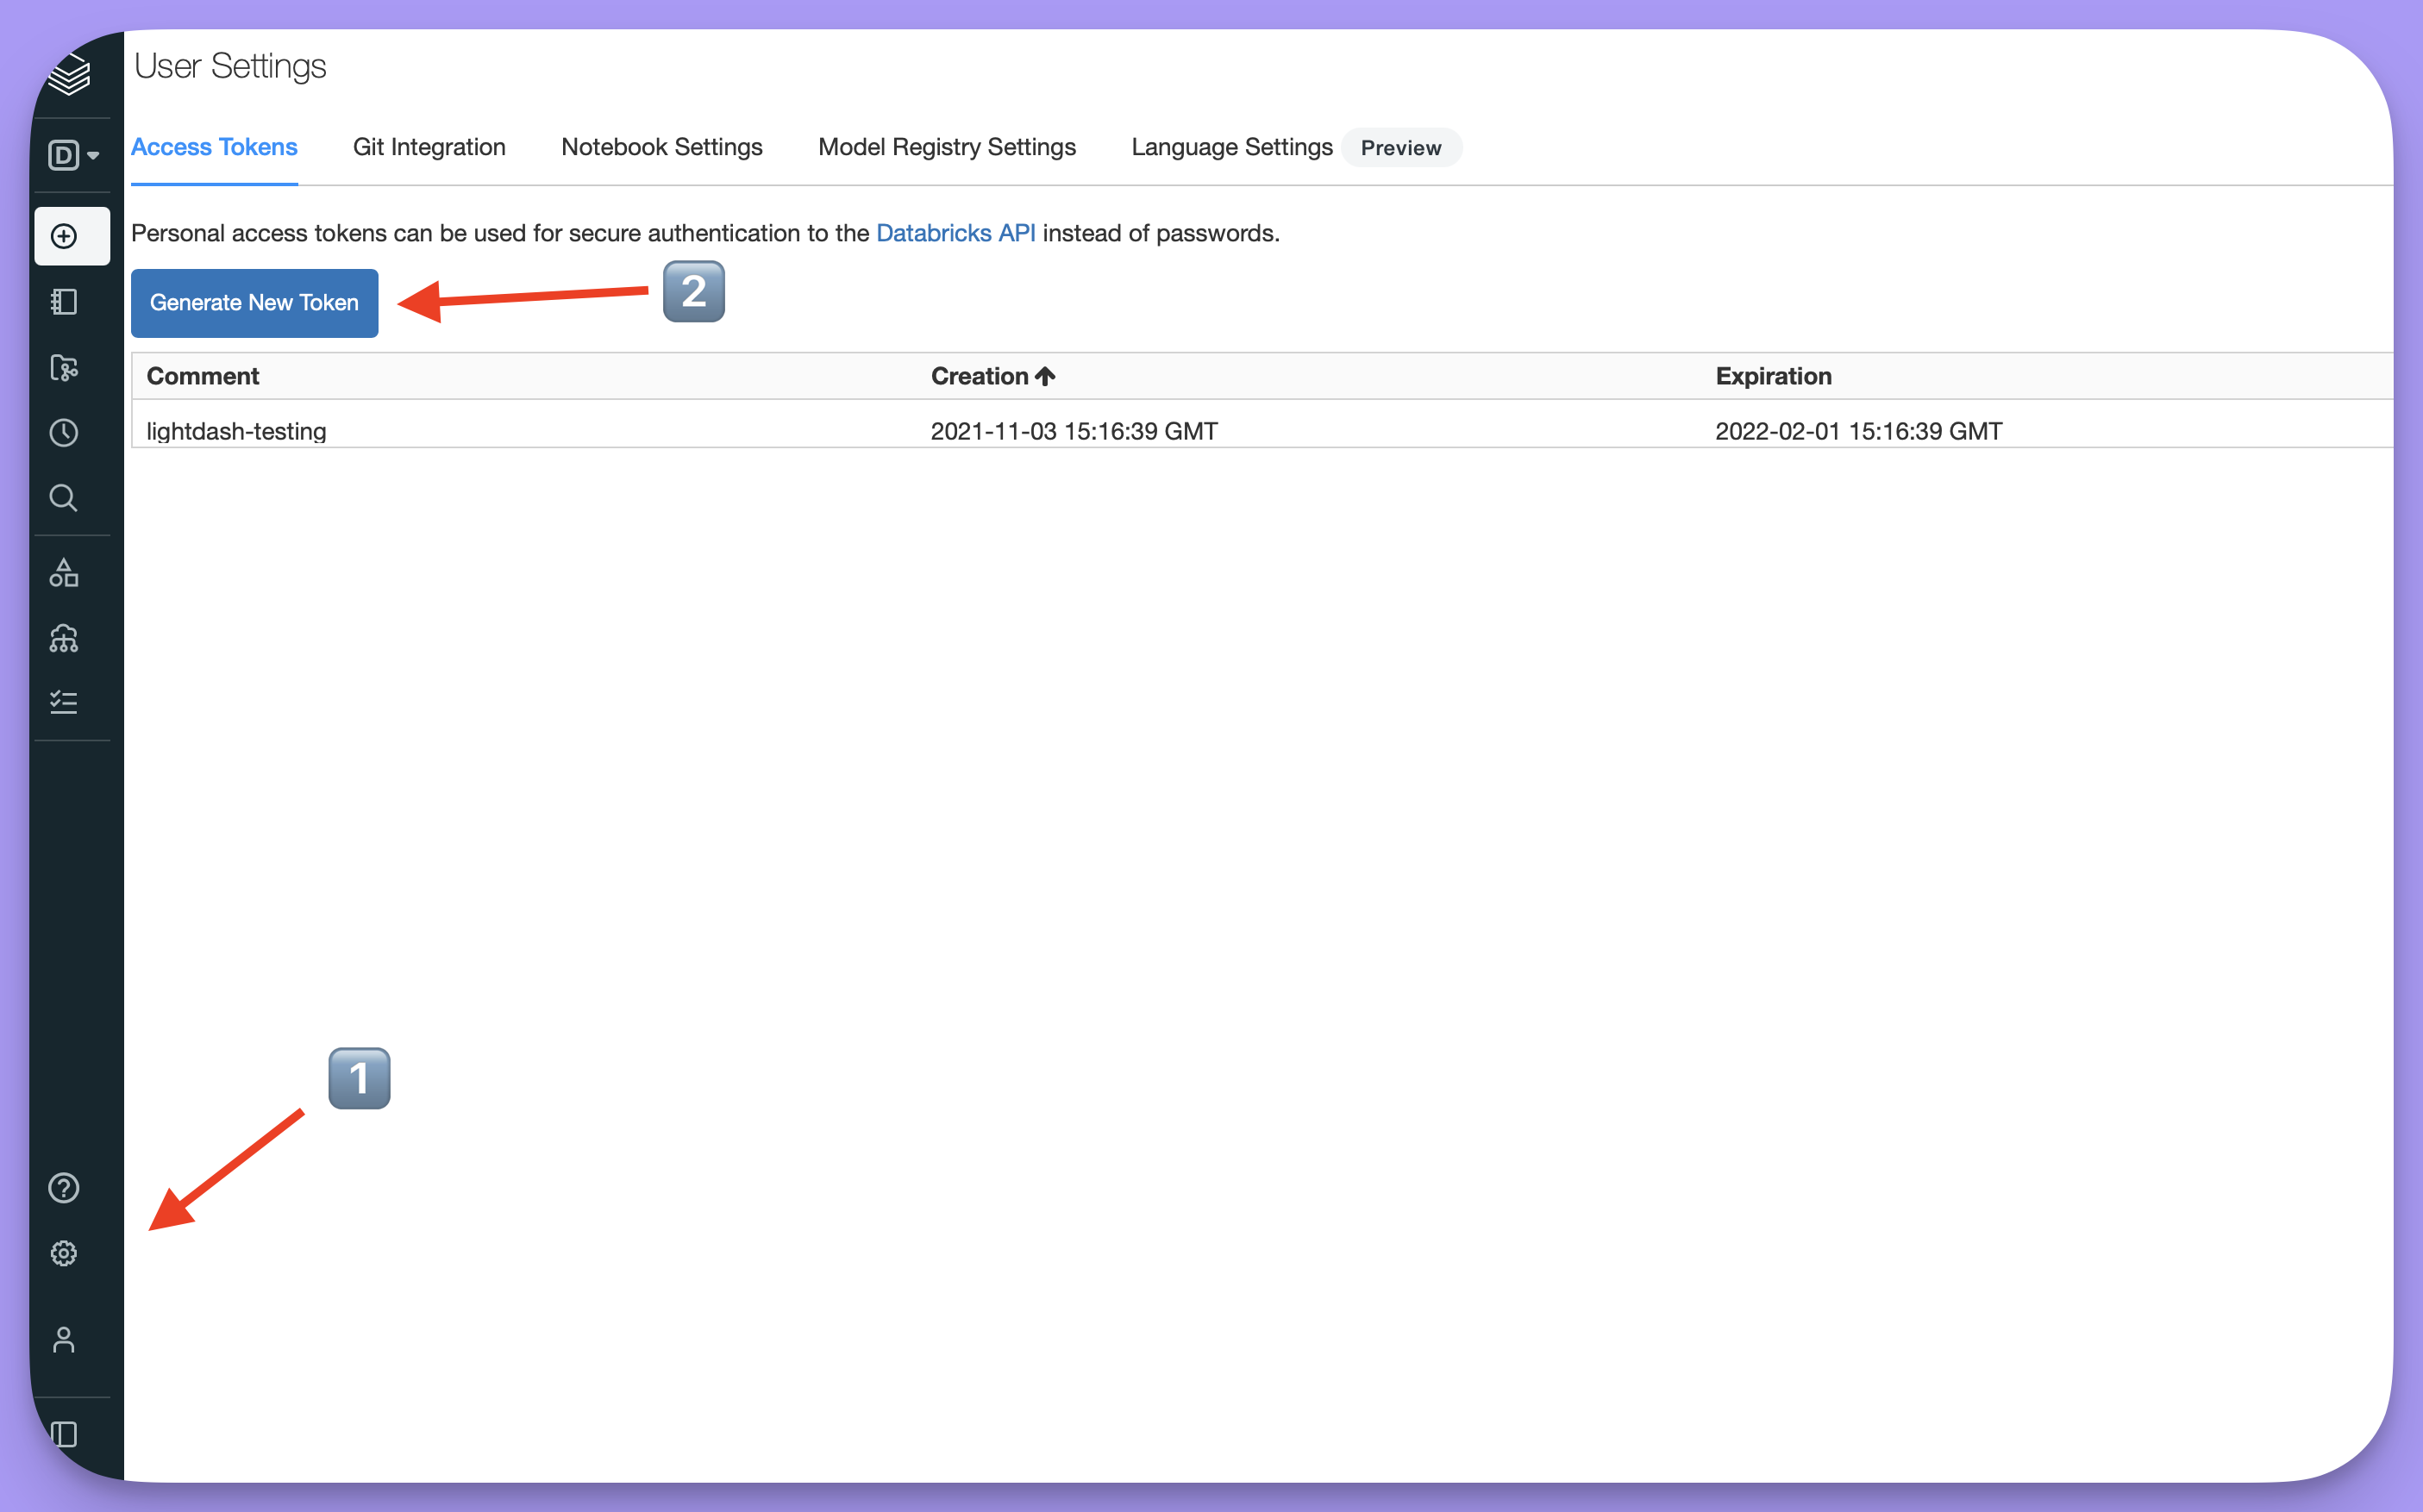
Your personal access token can be found in your user settings in databricks:
-
Open
Settingsby clicking the cog ⚙️ in the sidebar and selectUser settings -
Click
Generate token. You'll be asked to enter a name and expiry. -
Copy the token
Database
The default database name used by dbt for this connection.
Start of week
This controls what day is the start of the week in Qyra. Auto sets it to whatever the default is for your data warehouse. Or, you can customize it and select the day of the week from the drop-down menu. This will be taken into account when using 'WEEK' time interval in Qyra.
Trino
We only support LDAP authentication with Trino. You can see more details in dbt's documentation.
Host
The hostname of your cluster. E.g. mycluster.mydomain.com
Don't include the http:// or https:// prefix.
User
The username (of the account) to log in to your cluster. When connecting to Starburst Galaxy clusters, you must include the role of the user as a suffix to the username.
Format for Starburst Enterprise or Trino: user.name or user.name@mydomain.com
Format for Starburst Galaxy:user.name@mydomain.com/role
Password
This is the password for authentication.
DB name
Specify the name of the database that your dbt models are built into. This is the name of a catalog in your cluster.
e.g. my_postgres_catalog
Port
The port to connect to your cluster. By default, it's 443 for TLS enabled clusters.
e.g. 443
SSL mode
This controls how dbt connects to Trino database using SSL.
Start of week
This controls what day is the start of the week in Qyra. Auto sets it to whatever the default is for your data warehouse. Or, you can customize it and select the day of the week from the drop-down menu. This will be taken into account when using 'WEEK' time interval in Qyra.
ClickHouse
You can see more details in dbt documentation.
Host
This is the host where your ClickHouse database is running.
User
This is the ClickHouse database user name.
Password
This is the ClickHouse database user password.
DB name
This is the ClickHouse database name.
Schema
This is the default schema used by dbt to compile and run your dbt project. You can find this in your local profiles.yml file.
If you work with dbt locally, then check your profiles.yml file at ~/.dbt/profiles.yml and look for a field named schema:
my-clickhouse-db:
  target: dev
  outputs:
    dev:
      type: clickhouse
      host: [hostname]
      user: [username]
      password: [password]
      port: [port]
schema: [dbt schema] # Look for this one!Port
This is the port where the ClickHouse database is running. The default port for ClickHouse HTTP interface is 8123.
Secure
Enable this option to use HTTPS/SSL for secure connections to your ClickHouse database.
Retries
The number of times Qyra should retry ClickHouse queries that result in unhandled server errors. By default, this is set to 3.
Start of week
This controls what day is the start of the week in Qyra. Auto sets it to whatever the default is for your data warehouse. Or, you can customize it and select the day of the week from the drop-down menu. This will be taken into account when using 'WEEK' time interval in Qyra.
Known issues
Boolean expression columns must be typed as boolean
ClickHouse represents the result of boolean expressions, like status = 'active', as UInt8. If the column is not typed as boolean in your dbt schema, Qyra may treat it as a string dimension and generate a filter like IN ('true'). ClickHouse rejects this with an error like Cannot convert string 'true' to type UInt8. See GitHub issue #24028.
To avoid this, explicitly type boolean expression columns as boolean in your dbt schema:
models:
  - name: orders
    columns:
      - name: is_active
        data_type: boolean
Or set the Qyra dimension type:
models:
  - name: orders
    columns:
      - name: is_active
        config:
          meta:
            dimension:
type: booleanmodels:
- name: orders
columns:
- name: is_active
meta:
dimension:
type: booleanDuckDB
Qyra supports DuckDB project connections in two modes:
- MotherDuck — managed cloud DuckDB
- DuckLake — a DuckLake catalog backed by your own metadata store (Postgres, SQLite, or a DuckDB file) and your own data store (S3-compatible, GCS, Azure Blob, or local filesystem)
Pick the mode from the MotherDuck / DuckLake toggle at the top of the connection form. Both modes use the same dbt-duckdb adapter — see the dbt-duckdb documentation for adapter-level details.
DuckDB connections in Qyra require dbt v1.8 or later.
MotherDuck
Qyra supports DuckDB project connections through MotherDuck.
Database
This is your MotherDuck database name.
For example, if your dbt profile uses path: "md:analytics", the database value in Qyra is analytics.
Schema
This is the schema in your MotherDuck database that Qyra should use.
Access token
This is your MotherDuck access token. You can create one from your MotherDuck account settings.
We recommend using a dedicated token for Qyra with access only to the database(s) you want to query.
Threads
The number of threads dbt should use for this connection. If you're not sure what to use, start with 1.
Start of week
This controls what day is the start of the week in Qyra. Auto sets it to whatever the default is for your data warehouse. Or, you can customize it and select the day of the week from the drop-down menu. This will be taken into account when using 'WEEK' time interval in Qyra.
If you work with dbt locally, your profiles.yml should look similar to this:
my-motherduck-db:
  target: prod
  outputs:
    prod:
      type: duckdb
      path: "md:analytics"
      schema: main
      threads: 4
      extensions:
        - motherduck
      settings:
motherduck_token: "{{ env_var('MOTHERDUCK_TOKEN') }}"DuckLake
DuckLake separates catalog metadata (where DuckLake records tables, schemas, and snapshots) from data files (the Parquet files themselves). Qyra attaches the catalog read-only on a warm in-memory DuckDB instance and reads data files from your chosen object store.
You configure two backends independently: a catalog backend and a data path backend.
Schema
The default DuckLake schema your queries will use (for example, main).
Catalog alias
The alias under which Qyra attaches the DuckLake catalog. Defaults to ducklake. This is the name Qyra exposes as the database in dbt and in queries.
Catalog backend
Where DuckLake stores its metadata. Choose one of:
- PostgreSQL — recommended for multi-pod deployments. Qyra will need
host,port,database,user, andpassword. - SQLite — a SQLite file on the Qyra server. Provide the absolute path to the catalog file.
- DuckDB — a DuckDB file on the Qyra server. Provide the absolute path to the catalog file.
SQLite and DuckDB catalogs live on the Qyra server's local filesystem and are only viable for single-pod deployments. Use a PostgreSQL catalog if you run more than one Qyra pod.
Data path backend
Where DuckLake reads Parquet data files from. Choose one of:
- S3-compatible —
url(e.g.s3://my-bucket/path/), optionalendpointandregion, optionalaccessKeyId+secretAccessKey, and an optional path-style URL toggle. Leave the keys blank to use the SDK credential chain (IAM role, web identity, etc.). - Google Cloud Storage —
url(e.g.gs://my-bucket/path/) and optional HMACkeyId+secret. Leave the HMAC fields blank to use the SDK credential chain. - Azure Blob Storage —
url(e.g.azure://container/path/orabfss://container@account.dfs.core.windows.net/path/). Authenticate with either aconnectionString(takes precedence) oraccountName+accountKey. - Local filesystem — a directory on the Qyra server. Only viable for single-pod deployments.
Threads
The number of threads dbt should use for this connection. If you're not sure what to use, start with 1.
Start of week
This controls what day is the start of the week in Qyra. Auto sets it to whatever the default is for your data warehouse.
dbt profile examples
If you work with dbt locally, your profiles.yml should look similar to one of these.
PostgreSQL catalog + S3 data path:
my-ducklake-db:
  target: prod
  outputs:
    prod:
      type: duckdb
      path: ":memory:"
      database: ducklake
      schema: main
      threads: 4
      extensions: [ducklake, postgres, httpfs]
      settings:
        autoinstall_known_extensions: true
        autoload_known_extensions: true
      attach:
        - alias: ducklake
          path: "ducklake:ld_ducklake"
      secrets:
        - name: ld_ducklake_catalog
          type: postgres
          host: pg.example.com
          port: 5432
          database: catalog
          user: "{{ env_var('DUCKLAKE_CATALOG_USER') }}"
          password: "{{ env_var('DUCKLAKE_CATALOG_PASSWORD') }}"
        - name: ld_ducklake_data
          type: s3
          scope: "s3://my-bucket/path/"
          region: us-east-1
          key_id: "{{ env_var('AWS_ACCESS_KEY_ID') }}"
          secret: "{{ env_var('AWS_SECRET_ACCESS_KEY') }}"
        - name: ld_ducklake
          type: ducklake
          data_path: "s3://my-bucket/path/"
          metadata_parameters:
            TYPE: postgres
SECRET: ld_ducklake_catalogSQLite catalog + local data path:
my-ducklake-db:
  target: prod
  outputs:
    prod:
      type: duckdb
      path: ":memory:"
      database: ducklake
      schema: main
      threads: 4
      extensions: [ducklake, sqlite]
      settings:
        autoinstall_known_extensions: true
        autoload_known_extensions: true
      attach:
        - alias: ducklake
          path: "ducklake:sqlite:/var/lib/ducklake/catalog.sqlite"
          options:
data_path: "/var/lib/ducklake/data"Athena
You can see more details in dbt documentation.
AWS Region
The AWS region where your Athena workgroup is located (e.g. us-east-1, eu-west-1).
Catalog
This is the Athena data catalog name. For most setups, this is AwsDataCatalog.
Database
This is the Athena database name (also known as schema in other warehouses). This is where your dbt models are materialized.
S3 Staging Directory
The S3 location where Athena stores query results. This is required for all Athena queries.
e.g. s3://your-bucket/athena-results/
S3 Data Directory (optional)
The S3 location for storing table data when materializing models. This is optional and only needed if you're using dbt to create tables.
e.g. s3://your-bucket/data/
AWS Access Key ID
Your AWS access key ID for authentication. This should belong to an IAM user with permissions to run Athena queries and access the S3 buckets specified above.
AWS Secret Access Key
Your AWS secret access key for authentication.
Create a dedicated IAM user or role for Qyra with minimal permissions:
AmazonAthenaFullAccess, or a more restrictive custom policy- S3 read/write access to your staging and data directories
Self-hosted instances can use IAM role authentication (e.g. ECS task role, EC2 instance profile) instead of access keys. See the ATHENA_WAREHOUSE_IAM_ROLE_AUTH environment variable.
Workgroup (optional)
The Athena workgroup to use for queries. If not specified, the default workgroup (primary) is used.
Threads (optional)
The number of threads dbt should use. Default is 1.
Number of Retries (optional)
The number of times to retry failed queries. Default is 5.
Start of week
This controls what day is the start of the week in Qyra. Auto sets it to whatever the default is for your data warehouse. Or, you can customize it and select the day of the week from the drop-down menu. This will be taken into account when using 'WEEK' time interval in Qyra.
2. Import a dbt project
Connecting Qyra to a hosted dbt project means that you'll be able to keep your Qyra instance in sync with the changes in your dbt project.
The most common way to connect to dbt is to connect to a git repository where your dbt project is hosted. You can also connect directly using the CLI, or using the dbt Cloud connection type which leverages the dbt Cloud API.
To connect your dbt project, head to your project connection settings in Qyra:
Then scroll down to your dbt project connection:
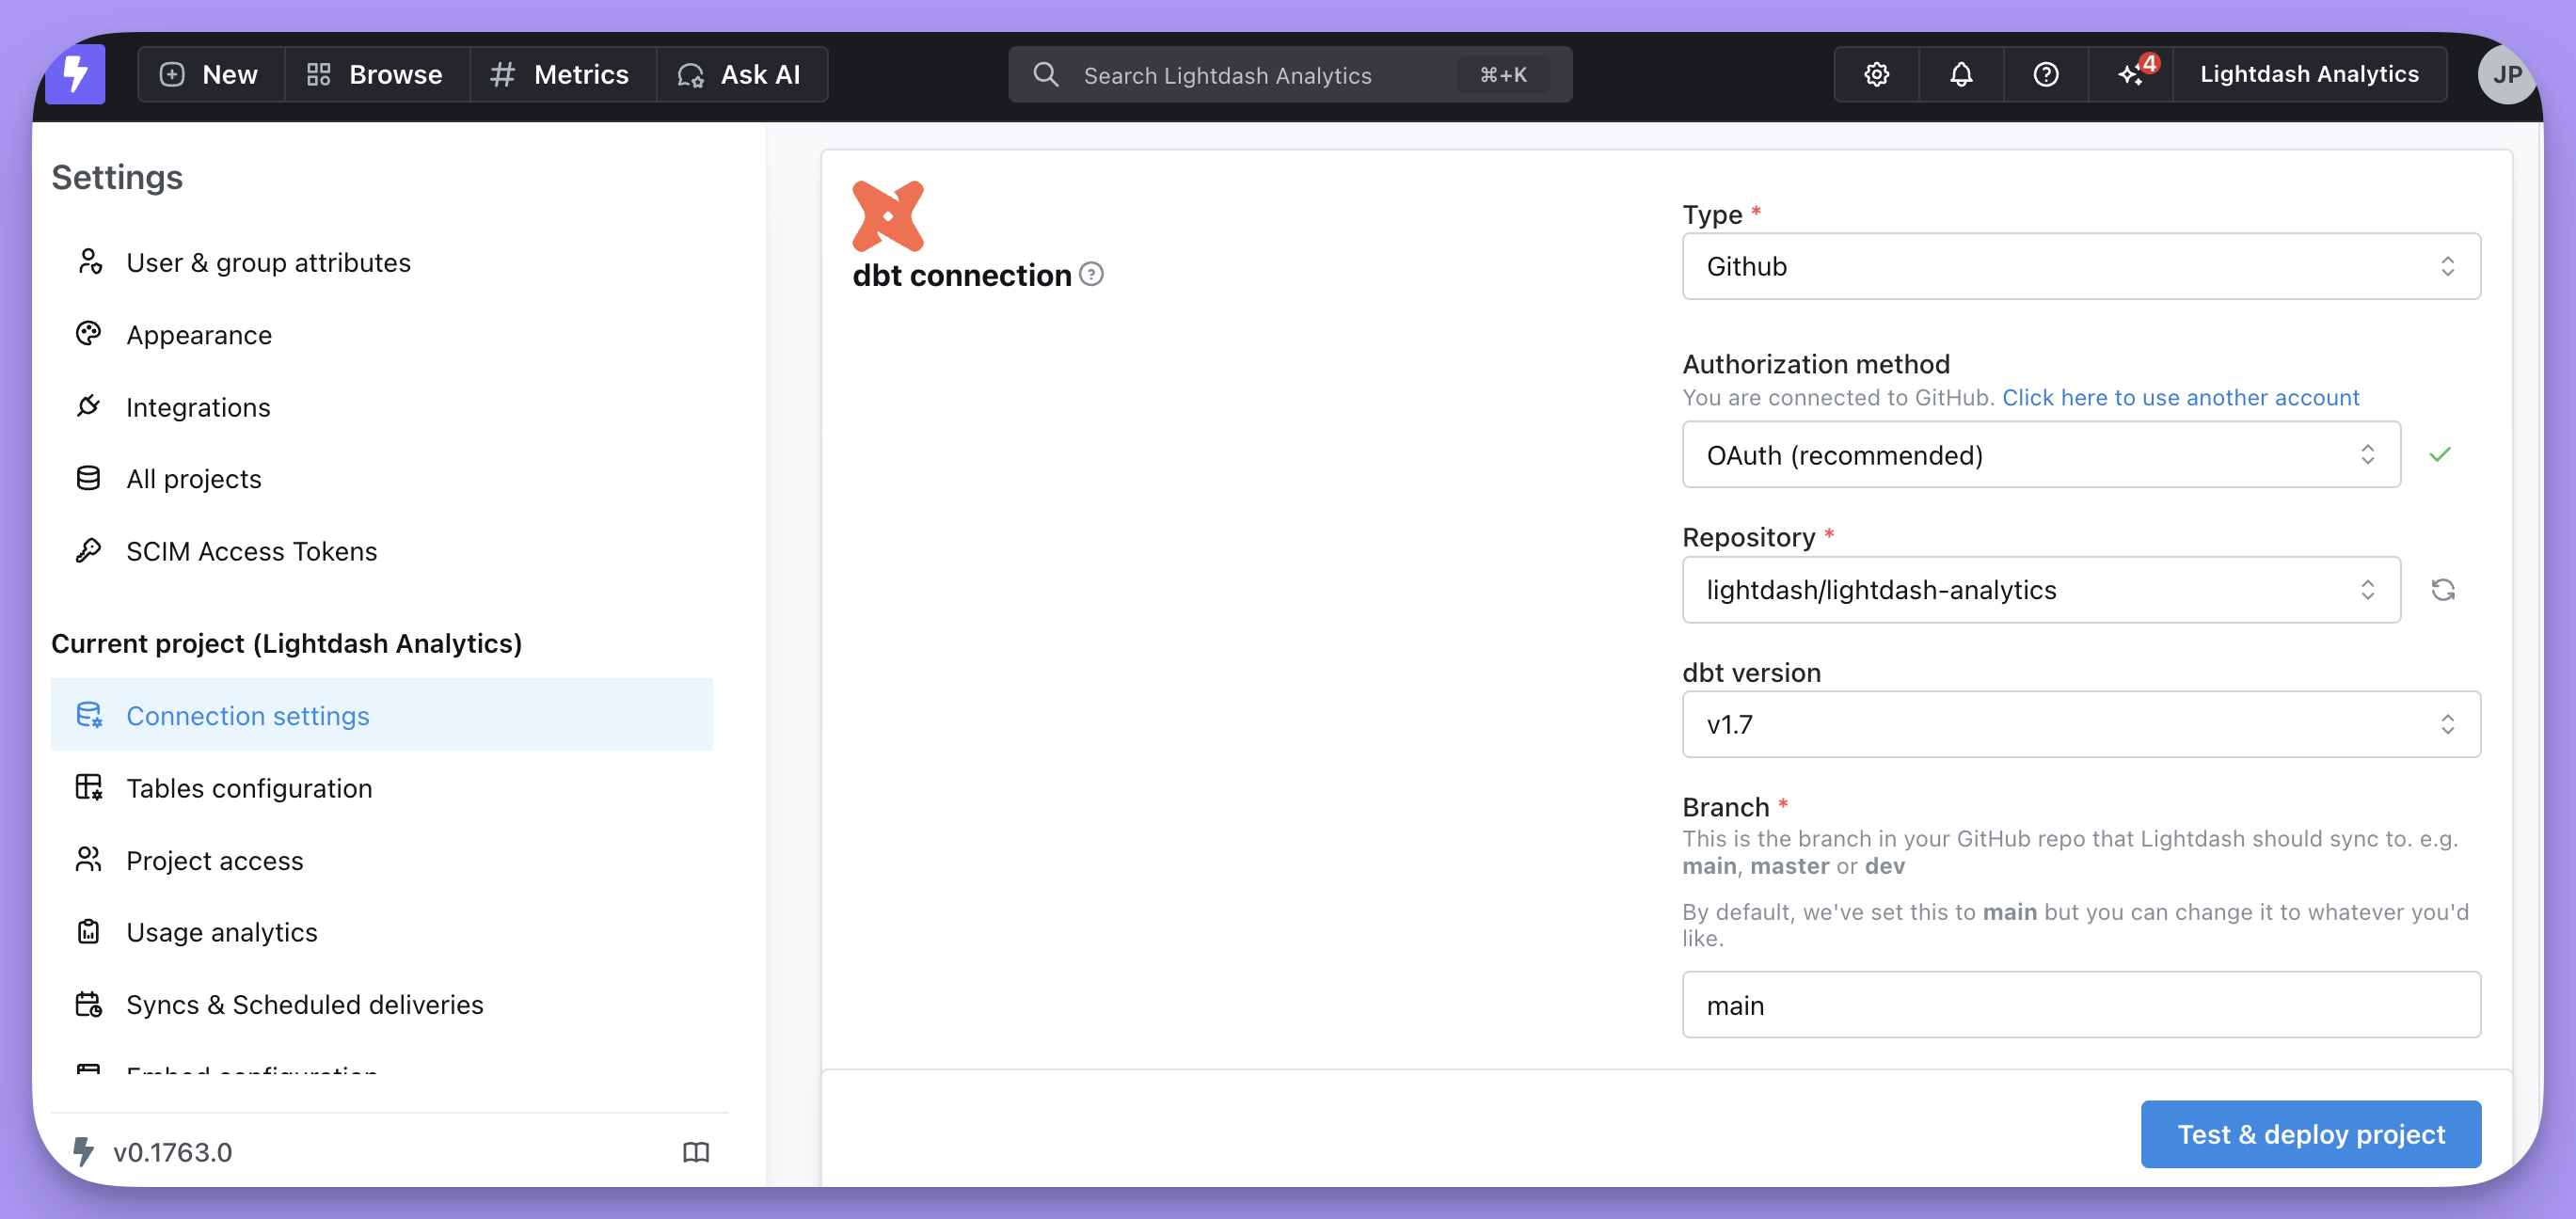
Pick your repository type and follow the guide below: GitHub, GitLab, Azure DevOps, Bitbucket, dbt Cloud, or the CLI.
dbt Cloud managed repositories
Support for connecting Qyra to dbt Cloud managed repositories is in beta. If you're using dbt Cloud and you'd like to use Qyra, please reach out to us.
GitHub
OAuth (recommended authorization method)
We recommend you connect to Github using OAuth. This gives Qyra a direct connection to the repo, so it won't lose access when individuals leave the company, and it can create pull requests, which is required for dbt write-back features. This connection lives at the organization level, so you can map different dbt project repos to each Qyra project without needing a new access token.
Personal access token (classic authorization method)
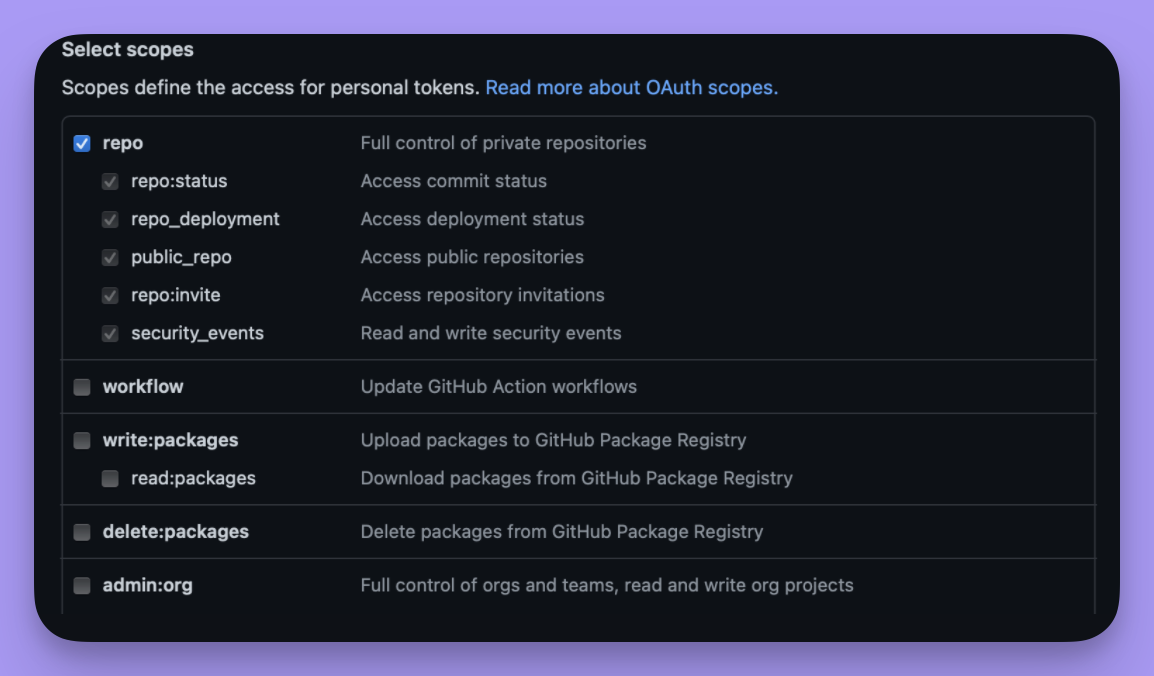
This is used to access your repo. See the instructions for creating a personal access token here.
Select repo scope when you're creating the token.
Fine-grained access token (beta authorization method)
Fine-grained access tokens are new special tokens that can only give access to individual repositories on your github account. You can read more about it on the Github docs.
- Go to Settings > Developer access > Personal access tokens > Fine-grained token
- Add the name, expiration, description and owner (we'll need their username later)
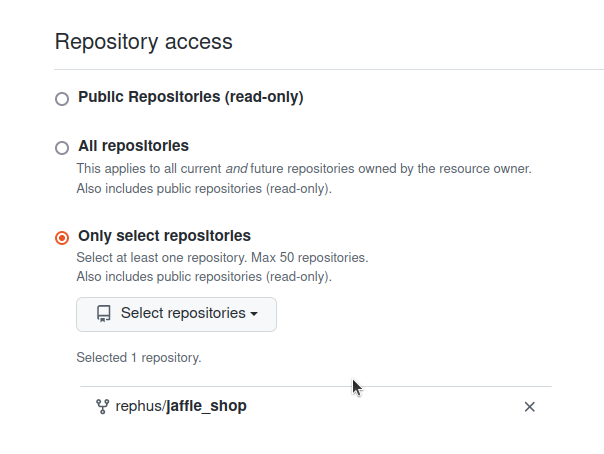
- Add the repositories you want Qyra to access. You might want to give access only to the repository where your
dbtproject is located.
- On
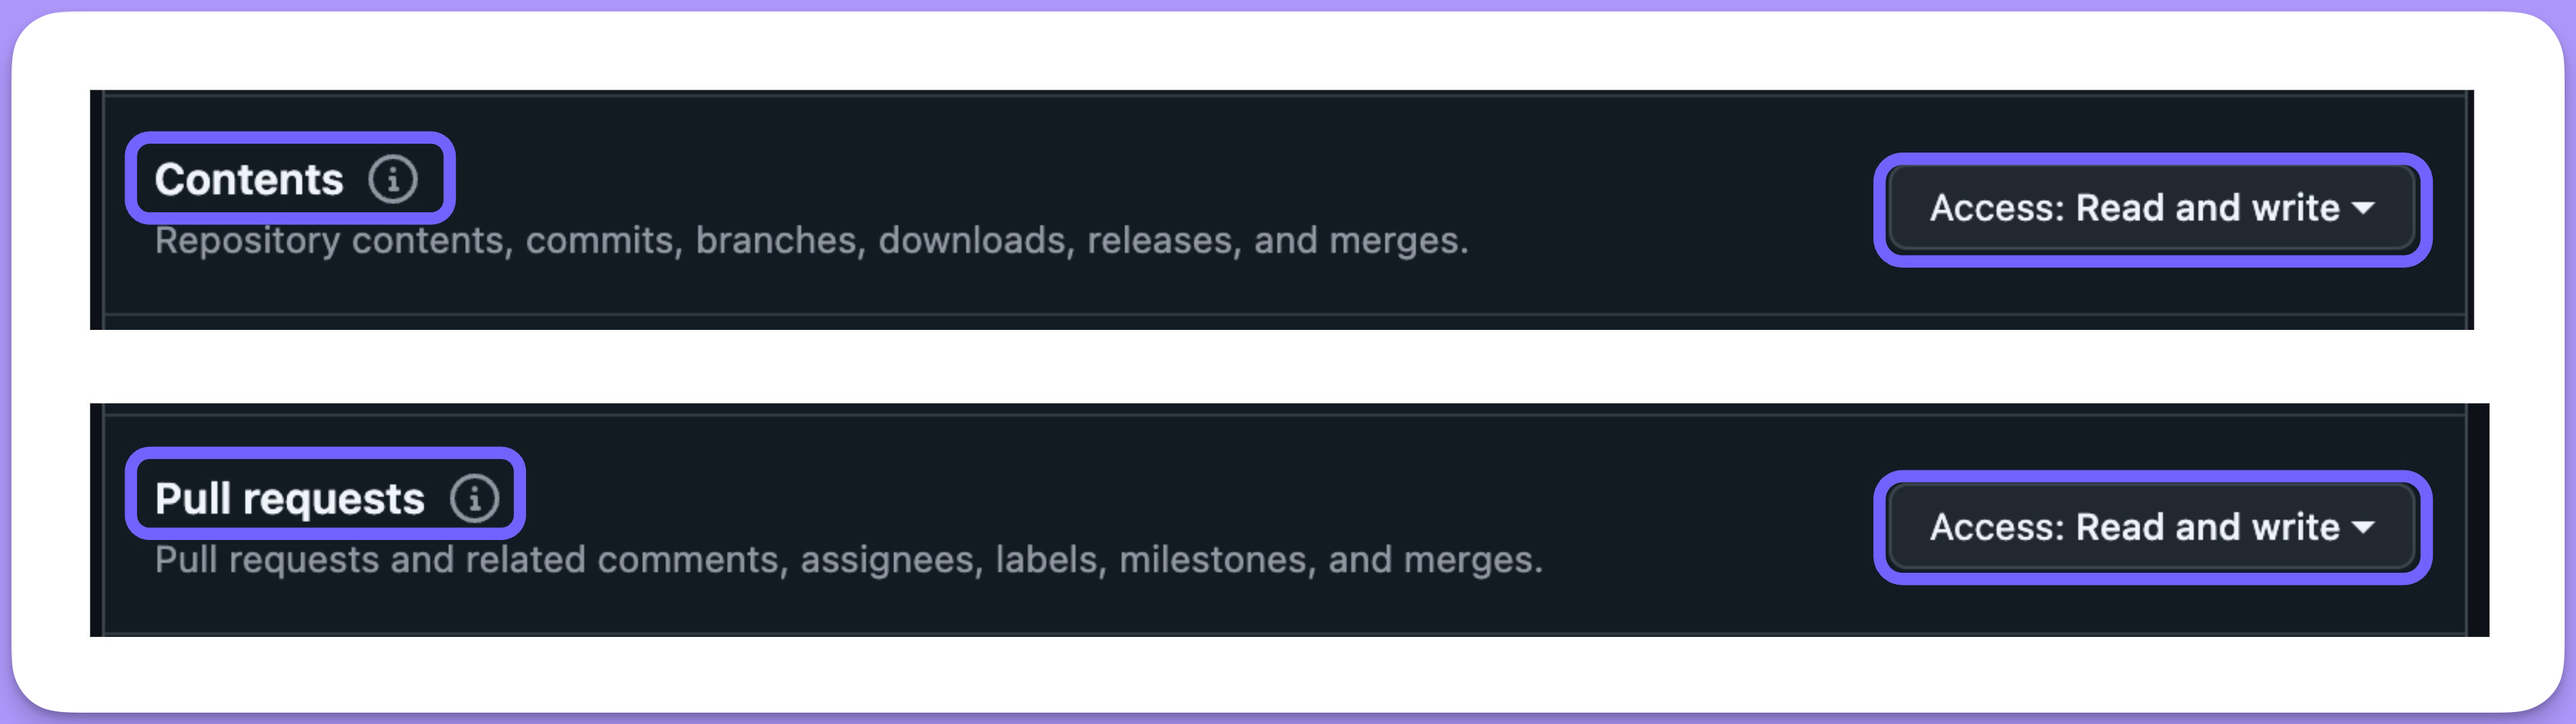
Repositorypermissions, selectContents-->Read and WriteandPull Requests-->Read and Write.
- Click
Generate tokenand copy the token.
You could also replace your old tokens with new fine-grained tokens on project settings.
Repository
This should be in the format my-org/my-repo. e.g. qyra/qyra-analytics
Branch
This is the branch in your GitHub repo that Qyra should sync to. e.g. main, master or dev
By default, we've set this to main but you can change it to whatever you'd like.
Project directory path
This is the folder where your dbt_project.yml file is found in the GitHub repository you entered above.
-
Put
/if yourdbt_project.ymlfile is in the main folder of your repo (e.g. qyra/qyra-analytics/dbt_project.yml) -
Include the path to the sub-folder where your dbt project is if your dbt project is in a sub-folder in your repo. For example, if my project was in qyra/qyra-analytics/dbt/dbt_project.yml, I'd write
/dbtin this field.
Host domain
If you've customized the domain for your GitHub pages, you can add the custom domain for your project in here.
By default, this is github.com
After adding your Github information, fill out the dbt project details and you're all set!
GitLab
Personal access token
This is used to access your repo. See the instructions for creating a personal access token here.
Select read_repository scope when you're creating the token. The token, if using a project access token, or the user, when using a personal access token, needs to have permission to download the code. Normally this would be the Reporter role.
Repository
You can find this in the GitLab URL when you're in your repo. This should be in the format my-org/my-repo. e.g. if my browser had https://gitlab.com/qyra/qyra-analytics.gitlab.io, I'd put in: qyra/qyra-analytics as my repository in Qyra.
Branch
This is the branch in your GitLab repo that Qyra should sync to. e.g. main, master or dev
By default, we've set this to main but you can change it to whatever you'd like.
Project directory path
This is the folder where your dbt_project.yml file is found in the GitLab repository you entered above.
If your dbt_project.yml file is in the main folder of your repo (e.g. qyra/qyra-analytics/dbt_project.yml), then you don't need to change anything in here. You can just leave the default value we've put in.
If your dbt project is in a sub-folder in your repo (e.g. qyra/qyra-analytics/dbt/dbt_project.yml), then you'll need to include the path to the sub-folder where your dbt project is (e.g. /dbt).
Host domain
If you've customized the domain for your GitLab pages, you can add the custom domain for your project in here.
By default, this is gitlab.io.
After adding your Gitlab information, fill out the dbt project details and you're all set!
Azure DevOps
Personal access token
This is your secret token used to access Azure Devops. See the instructions to create a personal access tokenYou must specify at least the Repo:Read scope.
Organization
This is the name of the organization that owns your repository
Project
This is the name of the project that owns your repository
Repository
This is the name of the repository. For many projects, this is the same as your project name above.
Branch
This is the branch in your repository that Qyra should sync to. e.g. main, master or dev
By default, we've set this to main but you can change it to whatever you'd like.
Project directory path
This is the folder where your dbt_project.yml file is found in the repository you entered above.
If your dbt_project.yml file is in the main folder of your repo (e.g. qyra/qyra-analytics/dbt_project.yml), then you don't need to change anything in here. You can just leave the default value we've put in.
If your dbt project is in a sub-folder in your repo (e.g. qyra/qyra-analytics/dbt/dbt_project.yml), then you'll need to include the path to the sub-folder where your dbt project is (e.g. /dbt).
After adding the Azure DevOps details, fill out the dbt project details and you're all set!
Bitbucket
Username
This is the login name for your Bitbucket user. This is usually the same username you use to login to Bitbucket. You can find your username in Bitbucket by:
-
Going to your avatar in the bottom left and click Personal settings.
-
From the Account settings page, check the value next to the Username
Alternatively, you can create a new user through the Bitbucket consolewith a username and password specifically for Qyra to use.
Http access token
Getting a token depends on whether you use Bitbucket Cloud or Bitbucket server:
-
Bitbucket Cloud users should follow instructions for creating an App Password
-
Bitbucket Server users should follow instructions for creating a HTTP Access Token
Select Project read and Repository read scope when you're creating the token.
Repository
This should be in the format my-org/my-repo. e.g. qyra/qyra-analytics
Branch
This is the branch in your Bitbucket repo that Qyra should sync to. e.g. main, master or dev
By default, we've set this to main but you can change it to whatever you'd like.
Project directory path
This is the folder where your dbt_project.yml file is found in the Bitbucket repository you entered above.
-
Put
/if yourdbt_project.ymlfile is in the main folder of your repo (e.g. qyra/qyra-analytics/dbt_project.yml) -
Include the path to the sub-folder where your dbt project is if your dbt project is in a sub-folder in your repo. For example, if my project was in qyra/qyra-analytics/dbt/dbt_project.yml, I'd write
/dbtin this field.
Host domain
If you've customized the domain for your Bitbucket server, you can add the custom domain for your project in here.
After adding your Bitbucket information, fill out the dbt project details and you're all set!
dbt Cloud
The dbt Cloud connection type bypasses any git connection, instead directly accessing metadata from your dbt Cloud project using the dbt Cloud API.
This means a number of features are not available, including:
- dbt write-back features
- Preview environments created in the UI from git branches
- Automatic refreshes on new commits to your git repo - you'll need to manually trigger refreshes in Qyra when you make changes to your dbt project.
MetricFlow metrics are translated automatically. If your dbt project defines MetricFlow semantic models and metrics, Qyra pulls them from the dbt Cloud Discovery API on each refresh and translates the supported ones into Qyra metrics — no dbt Semantic Layer configuration needed. See dbt MetricFlow metrics for what translates and for dbt Cloud–specific limitations.
Service Token
To connect Qyra to your dbt Cloud project, you'll need to create a dbt Cloud service token with the 'Metadata Only' and 'Job Viewer' permissions.
Environment ID
This is the identifier for your dbt Cloud environment. You can find this in the URL when you're in your dbt Cloud environment. Qyra will use this to identify which environment it should be built from, so commonly you'll point to your production environment here.
Webhook for dbt
This webhook is an optional extra for those using the dbt Cloud CI steps. If you set up a webhook in dbt Cloud that triggers when a job completes, paste the webhook address into dbt Cloud and Qyra will automatically spin up a preview for the given CI environment.
Follow the dbt Cloud webhooks guide to create a webhook that fires on job completion, and set the endpoint URL to the value shown in this field.
Webhook secret
Optional, but recommended if you configure the webhook above. When you create the webhook in dbt Cloud, dbt Cloud generates a signing secret — paste that secret here so Qyra can verify the HMAC signature on each incoming webhook and confirm the request genuinely came from dbt Cloud.
- The secret is stored encrypted and is stripped from API responses, so it never appears in project payloads returned by the Qyra API.
- Leaving this field blank preserves the previous behaviour: webhook requests are accepted without signature verification (backwards compatible).
- If you edit the project without re-entering the secret, the existing value is preserved.
Discovery API Endpoint
The dbt Cloud metadata API host for your region. Must use https://. Match it to your dbt Cloud access URL:
- US multi-tenant:
https://metadata.cloud.getdbt.com - EU multi-tenant:
https://metadata.eu1.dbt.com - Cell-based (URL like
abc123.us1.dbt.com):https://<prefix>.metadata.us1.dbt.com
CLI
The CLI connection type is the default type for projects that were created using the CLI via the qyra deploy --create command.
Usually, we recommend swapping to a direct connection to your git repo after initial project creation, but if you want to continue managing deployments in the CLI, read this guide on how to use Qyra deploy and set up continuous deployment.
Local dbt project
Unsuitable for production and only available for Qyra instances installed on your local machine
To start Qyra with the option to connect to a local dbt project, you must specify the directory of the dbt project when you start docker compose:
# Specify the absolute path to your dbt project
# e.g. export DBT_PROJECT_DIR=/Users/jake/mydbtproject
export DBT_PROJECT_DIR= # Enter your path here!
docker compose start